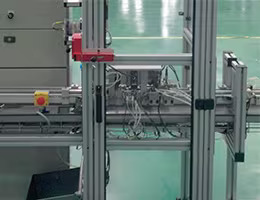
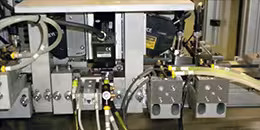
Duhamel DTI has designed a bench for testing the magnetic circuits of electrical contactors that use the LJ-G Series 2D laser displacement sensor by KEYENCE. The resulting performance is extraordinary – a rate of 4,000 to 5,000 parts per hour with micron-level accuracy.
Duhamel DTI is an engineering firm located at Domène, near Grenoble, at the foot of the French Alps. Its highly multidisciplinary team designs systems such as test benches and inspection equipment. Duhamel DTI has developed a high-speed measuring system to inspect the flatness of the magnetic poles of electrical contactors. These measurements must be extremely accurate, even the slightest defects cause an acoustic phenomenon known as ‘humming’ or even contactor malfunction.
The conventional method consists of using ultrasonic sensors, but these require measurements to be taken in an oil bath, which is very cumbersome, especially at the desired speeds. In addition, it entails many adjustments that impair the clarity and stability of the measurements.
“We wanted to provide a new and more reliable technology, and we took the risk of offering a laser system that is not affected by the oil film that can be found on the poles of magnetic circuits. So we had to get it right and provide a solution with all the guarantees,” says Jean-Pierre Bochet, Business Manager at Duhamel DTI.

The concept consists of using four LJ-G sensors to obtain four ‘measurement lines’ that are used to derive four measurement segments for inspecting the poles and four measurement segments for inspecting the pole gaps. Each resulting contactor profile consists of 500 measurement points that are used to model flatness with the least-squares method. All the measurements are compared against a master profile recorded beforehand in the system. “It is effective at accurately analyzing the surface quality of parts,” says Bochet.
“The difficulty with most laser devices on the market is that their operation is opaque. The preprocessing steps do not give any indication of what the outcome will be. KEYENCE’s displacement sensor is clearer and more flexible. The analogue output provides raw data, which makes analysis simpler and more accurate. We know exactly what we’ve got. The same is true for the operating parameters.
For example, with KEYENCE, the sampling speed is given in milliseconds. With the competition, however, there is only an ‘OK’ or ‘NG’ signal. KEYENCE is also one of the few companies that we enjoy working with. Other companies tend to impose their solutions, but our relationship with KEYENCE is one of trust and collaboration,” adds Bochet.

The LJ-G5000 is a 2D laser displacement sensor. It features a unique E3-CMOS (Enhanced Eye Emulation CMOS) sensor that has a dynamic range that is 300 times wider than that of conventional sensors. This gives the LJ-G5000 unparalleled measurement stability, even with complex surfaces such as elastomers and metals. The E3-CMOS also replicates the accommodation function of the human eye and creates complete digital reproductions of surface profiles despite dark or overly bright areas.
In addition, the MFL function adjusts the CMOS sensitivity, the laser intensity and the exposure time (the darker the target, the longer the sampling time and vice versa). Conventional solutions with conventional sensors average measurements to compensate for the lack of stability. Not only is this technique less accurate, it also requires more than 15 times longer sampling times. As a result, the performance of the LJ-G is in a class of its own – 1 μm repeatability and a 3.8 ms sampling rate.
“What you read in the product instructions is true. Not only does the LJ-G provide accurate measurements, it achieves accuracy down to 0.5 microns. The measurement cycle time for our application is 150 to 250 ms, we believe that such speed is possible only with the LJ-G. Since being put into service, our test bench has been operating around the clock without any drift in measurements,” says Bochet.
Duhamel DTI designed the entire test bench and an advanced high-speed conveyor system that accurately positions parts to be inspected. The company designs innovative in-line inspection solutions as well as electronic systems for the biggest names. Half of Duhamel DTI’s systems are installed outside France.
Credits: Keyence
Click on the following link Metrologically Speaking to read more such case studies about the Metrology Industry.


