Hand gauges at the point of manufacture are commonplace, but this doesn’t mean just any gauge can be used.
Inspection is often subject to the management team’s efforts at cost control or cost containment, as is the case with most other areas in modern manufacturing operations. Although it’s sound business judgement to maximize the value of every dollar, it also means that hard choices must be made when selecting handheld gauges.
For example, issues as diverse as training, personnel, throughput requirements, manufacturing methods and materials, warranties, the intended end-use of the workpiece, and general company policies on gauging methods and suppliers may influence both the effectiveness and the cost of the inspection process.
Furthermore, many companies have moved inspection out of the lab and onto the shop floor. By having the gauging at the point of manufacture, bad parts can be found immediately, and corrections can be quickly implemented to prevent others from being made.
As this occurs, machinists and manufacturing engineers become more responsible for potential quality issues. Tight-tolerance measurements that were once performed in a semiclean room by a trained inspection technician are now being done right next to the machine, often by the machinist. However, just because hand gauges at the point of manufacture have become commonplace does not mean that just any gauge can be taken onto the shop floor.
To ensure optimal gauge performance, there are numerous specifications and care issues that must be addressed.
Is the gauge designed to withstand the rigors of the shop floor environment?
Gauges designed for laboratory use often can’t cope with the dust and oil present on the shop floor. Some features commonly found on good shop-floor gauges include:
• Careful sealing or shielding against contaminants
• Smooth surfaces without nooks and crannies that are difficult to clean
• Sloping surfaces or overhangs designed to direct dust and fluids away from the display
Is the gauge designed to help the user get good measurements?
A gauge with good gauge repeatability and reproducibility (GR&R) numbers will generate repeatable measurements for anyone who is trained to use it properly. Technique or “feel” should have minimal effect on results. Gauges with good GR&R have a robust look and feel to them. Part alignment is designed in, to make sure the part is held the same way every time and to eliminate the effects of operator influence on part positioning.
Is the gauge easy to operate?
Machinists often prefer gauges that operate like their CNC machines; once it has been programmed, the user can push a button and the machine runs, cuts a feature, and is ready for the next part. Gauging should be simple, too, requiring as few steps as possible to generate results. If a variety of parts are to be measured on the same gauge, it should allow for quick, easy adjustment to the next size. If data collection is required, it should be nearly transparent to the operator using the gauge.
No matter how well-protected against contamination, if a gauge is used on dirty parts, or in a dirty environment, it will get dirty. At the end of every shift, users should wipe down the master and place it in its storage box. Inspect the gauge for loose parts: contacts, reference surfaces, locking knobs, posts, arms. If this is done every day, the life of the gauge can be prolonged by years, or at minimum it will make it easier for the calibration department to check it out and verify its operation.
Comparative gauges
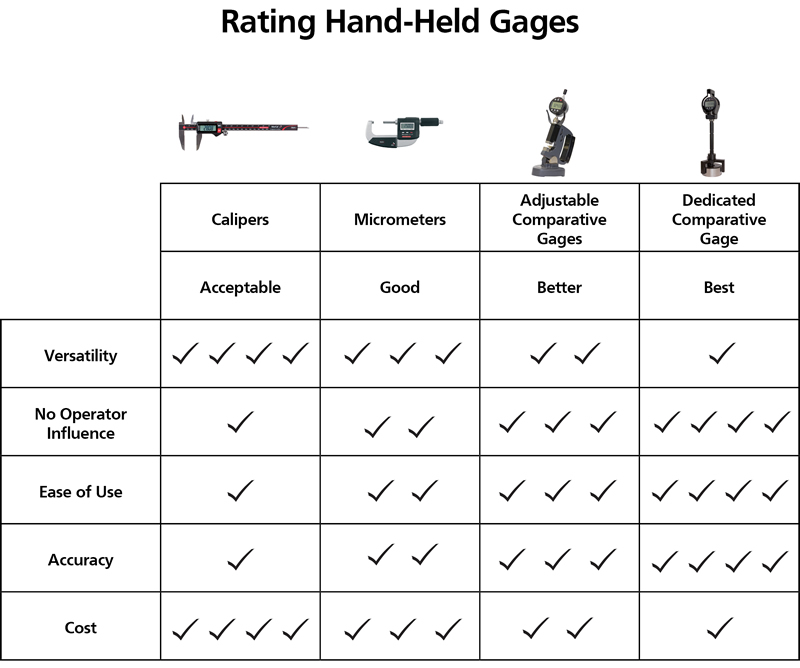
Once a job gets into an area where accuracies are within 0.0005-in. tolerance, a comparative gauge—such as comparative snap gauge, mechanical, or air ID/OD gauge—is an optimal tool.

For example, if an operator is checking a shaft diameter on the CNC lathe after the manufacturing process is complete, micrometers may be the instrument of choice, and it’s possible to resolve to 0.00005 in. or so. The issue with this is unproductive time for the operator using a micrometer that must be aligned and adjusted for each size to be measured; more moving than measuring. A better choice would be an adjustable snap gauge.
Insert a snap gauge onto a workpiece, and it is easy to see how these extremely effective, fairly simple outside diameter (OD) gauges got their name. Once the part is pushed through the leading edge of the contacts, the part slips easily back against the backstop, contacting it with a good, healthy “snap.”
Snap gauges can be handheld to measure workpiece ODs while still on the machine, or they can be mounted on stands for use with small parts. The heart of the tool is a simple C-frame casting, and measurements rely upon a direct inline 1:1 transfer of motion. These factors make snap gauges simple, reliable, and fairly inexpensive.
With a standard dial indicator installed, the measuring range of an adjustable snap gauge is typically 0.020 in., with a resolution of 0.0001 in. But there’s no rule that says an adjustable indicating gauge must have a mechanical dial indicator. With a good digital indicator, a resolution of 20 µin. can be achieved for tolerance measurements tighter than 0.0005 in.
Aside from the higher performance of the snap gauge, other key features include the speed of the measurement and the lack of operator influence. There is no need to adjust the gauge to the right size, or ensure the gauge is square to the part, or to apply the right force on the part. That’s all built in. Thus, snap gauges improve performance through speed and accuracy.

A fixed-plug comparative gauge allows the operator to get the best measurement with no operator influence.
However, if the operator needs to measure a bore tolerance to ±0.0002 in., on a machine and in a machine-shop environment, a fixed-variable gauge is required. In this case a mechanical plug gauge—generally with 0.003-in. total measuring range, but one that can get performance resolution to 10 µin. or better—is a good choice, and it can be just as fast as the mechanical snap gauge.
Documenting the results
Digitalization has changed the manufacturing world. As modern technology increasingly shapes industry, there will be a significant change as information becomes accessible to everyone.
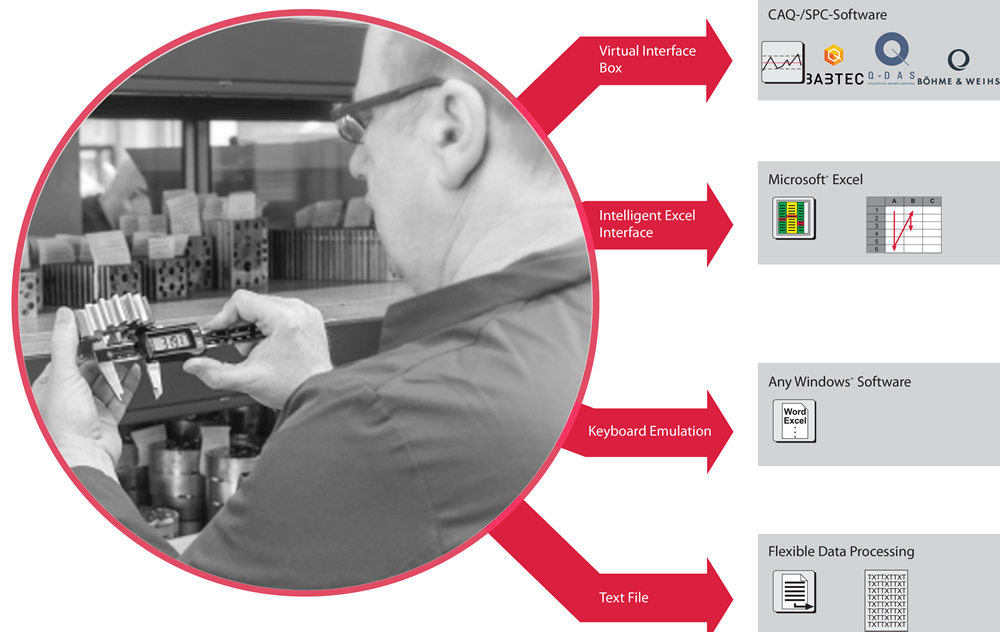
Because it’s now common to check parts at the point of manufacture with hand gauges connected to a computer via a cable, data collection is the norm. Today’s hand tools and digital indicators have data output built in, and collecting data is easy and very cost-effective. However, having the wires at the point of manufacture can be a bit of a hazard, either to the gauge (cables getting hung up on something) or to the operator by interfering with normal routine.

The next generation of factory automation aims to take data collection to new levels. From monitoring processes all along the manufacturing progression, to collecting and storing data from the individual measurements, to the offsets sent to the machines, to the production results, a lot of data need to be collected. This must be easy and transparent to the operator, with no additional work to delay the process and hinder data collection.
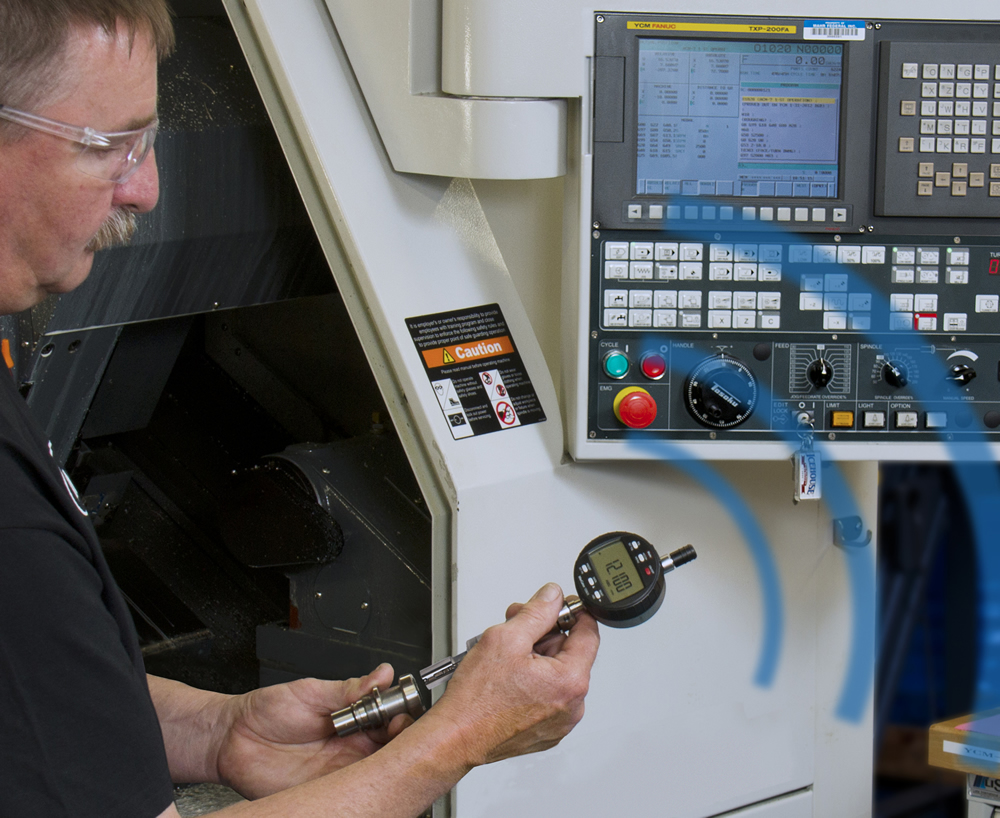
To accomplish this, small transmitters are now being built into digital calipers, digital micrometers, and digital indicators on gauges that allow them to transmit data to a computer. Each integrated transmitter in the measuring tool uses a slightly different signal coding that allows as many gauging stations as possible to communicate to a single computer simultaneously. Today, these transmitters are not that much more expensive than data cables, making the cost more than justifiable when cabling alone won’t get the job done.
This technology is ideal for the in-process/right-at-the-machine-tool applications. Transmitted wirelessly into the machine tool’s controller, the data can be used as part of the calculation for offsetting. Thus, as the operator measures the parts, the data are used to assign the proper offsets, greatly improving the quality and throughput of the machine tool. Out-of-spec parts are virtually eliminated, and the ability of the machine to make parts to the desired dimensions is greatly improved.
With these transmitters, very large parts can be measured where they sit, or parts can be measured in the machine tool without having cables get caught in the tooling. Additionally, the tools provide visual feedback by generating a signal to the operator that the transmission was received and acknowledged by the computer. This is virtually instantaneous so as not to slow the operator down, and most transmitters can be configured to provide a go/no-go signal to the user, depending on whether the part is within tolerance.
At the same time, the data can be stored for long-term archiving in the cloud, recording when the part was measured and by whom. It can also be used for tracking and improving operator throughput.
Today the next revolution is beginning, with a combination of digital gauging for accurate, shop floor measurement, unrestricted wireless transmission of reliable data, and statistics for process control. Combine this with the way machines, robots, inventory, and material-handling systems are all talking together, and we truly are getting closer to the Fourth Industrial Revolution.
ABOUT THE AUTHOR

George Schuetz
George Schuetz is director of Precision Gages at Mahr Inc.


