An Important Factor in Precise Measurements: Laser Tracker Warm-up Time
In aerospace, one of the most extensively used measurement instruments is the laser tracker. Laser trackers are very precise devices composed of extremely complex subcomponents such as interferometers and angular encoders. They are basically robots capable of following reflective targets. And, as with all robots, they are subject to specific sensitivities. One of the most crucial of these is their sensitivity to thermal effects.
Warm up time is the main thermal factor after initializing the laser tracker. It specifies the time period until the laser source reaches a stable temperature level after turning on.
![]()
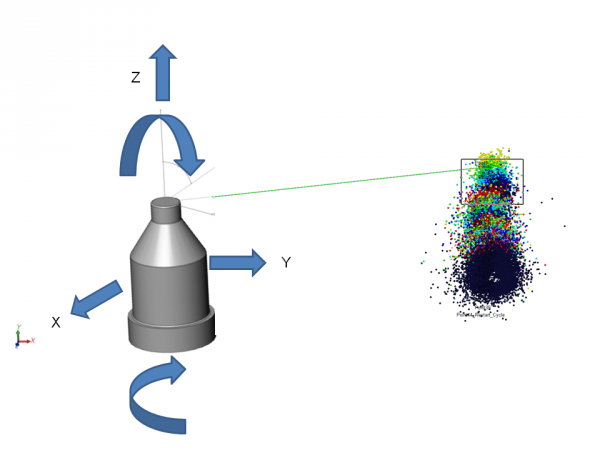
Figure 2. Laser tracker and spherical coordinates as raw measurement data: Elevation angle, azimuth angle and distance.
Raw measurement data from laser trackers: Spherical coordinates
In order to determine where a point is in 3D space, laser trackers measure three spherical coordinates: Elevation angle, azimuth angle and distance. The elevation and horizontal angles are measured by angular encoders placed in the laser axes while the distance is measured by the laser interferometer (Figure 2). These spherical coordinates (azimuth-elevation angles and distance) are transformed by algorithms into spatial Cartesian coordinates (x-y-z).
The subject of this text is the deviation of the elevation angle during the warm-up time and the resulting deviation in measured coordinates during this time period.![]()
Figure 3. Drift in measured laser tracker values
Drift during laser tracker warm-up
In our tests, we observed that the measured clouds move in the direction of the elevation angle even after the recommended fifteen-minute warm-up time (Figure 3). And the stabilization of this drift can take up to two hours.
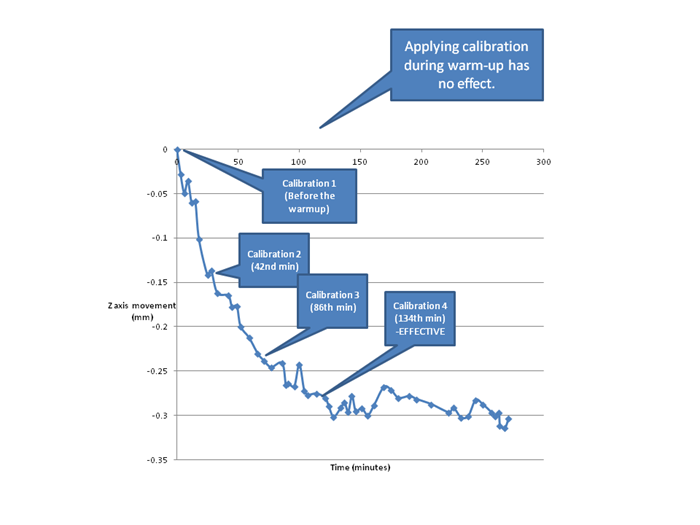
Figure 4. Z-axis drift during laser tracker warm-up time
Calibration is useless during warm-up
As we can observe in Figure 4, calibration is nearly useless during this period because of the instability of the system. The elevation angle drift causes a continuous deviation along the z-axis during warm-up time. The corresponding error along the z-axis is up to 300 micrometers, which is unacceptable by precision metrology standards. But why this peculiar behavior? What can be the specific mechanism behind this?
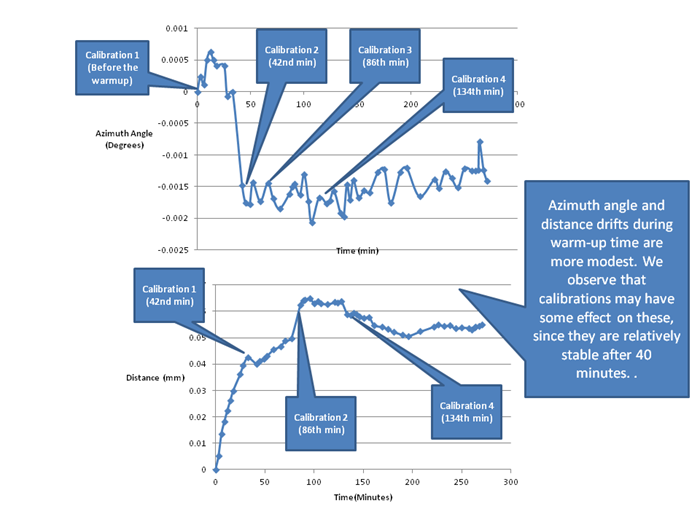
Figure 5. Azimuth angle and distance measurements are relatively stable after 40 minutes.
Let us also note that the azimuth angle and distance are relatively more stable and they are more positively affected by the manufacturer specified calibration (Figure 5). However, this does not shed any more light on our search. Why is one angular component error so much larger than the other during warm-up time?
Laser tracker design can affect measurement behavior during warm-up time
A bit of detective work made us realize the reason: the laser source placed directly in the elevation angle head creates a thermal gradient and causes misalignment. Naturally, the elevation angle is the most affected by this particular behavior during warm-up time.
Let us clarify that this study only investigated a specific type of laser tracker. But several academic articles also confirm our observations: It can take up to two hours to reach a stable condition for laser trackers. And the interesting fact is that these articles concern different types of laser trackers. [1,2]
Thus our takeaway on this issue would be:
Warm-up tips for ideal measurement conditions:
- Wait at least 1.5 hours for warm-up (This is stated as “official time”, but will depend on room temperature and laser head temperature conditions. In our case it was 2 hours).
- This wait time is valid for both IFM and ADM modes.
- Make a full volume calibration after warm-up.
- Apply periodic calibration even after warm-up.
- As long as the laser head is not fully warmed up, any calibration is useless.
References
- Sugahara, Ryuhei, Masuzawa, Mika, & Ohsawa, Yasunobu (2010). Performance test of laser trackers of FARO. Proceedings of the 7th annual meeting of Particle Accelerator Society of Japan, (p. 1232). Japan
- G. Gassner, R. Ruland , Instrument tests with new Leica AT401, IWAA 2010, Bessy Sept 2010


