In today’s production environment, automation, quality, and quantity of information acquired about the product are essential factors for success. To achieve these goals, many industries rely on 3D scanners to capture accurate and detailed information about their products at every stage of production.
But what are 3D scanners, how do they work and how can they improve production processes? In this article, we will explore these questions using examples of 3D scanners from Scantech, one of the leading manufacturers of 3D scanning tools.
What is a 3D scanner?
A 3D scanner, also known as an optical measuring machine, is a device that can capture the shape and geometry of real-world objects and create 3D models of them, by converting the captured data into STL triangle mesh. These digital 3D models can then be used for various purposes, such as quality control or product development.
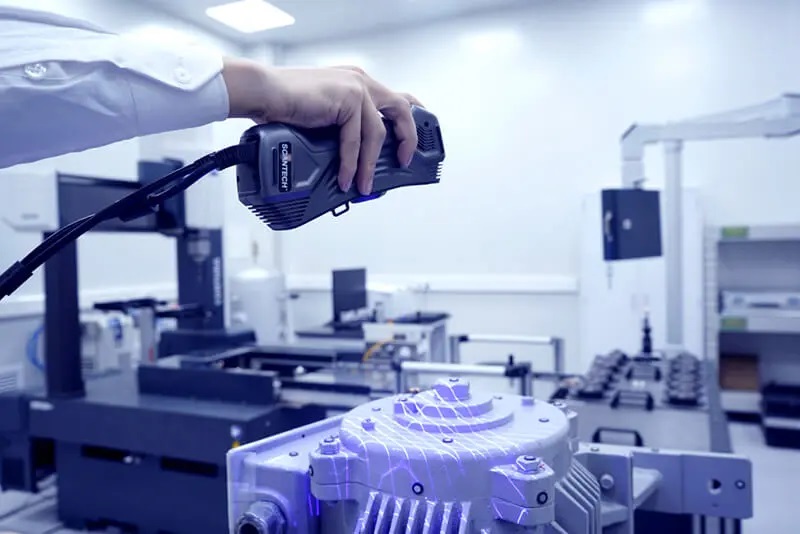
Handheld 3D scanning tools have many advantages over other types of measuring machines. They are faster, more versatile, and more mobile than traditional methods. They can measure objects without touching them, which prevents damage and deformation. They can also collect a large amount of data in a short time, which allows for a detailed analysis of the object’s shape and features. Thanks to their portability, they can be easily transported and used in different locations and environments, even in places that are hard to reach or have vibrations.
One example of a compact and portable industrial 3D scanner is the SIMSCAN, which is distinguished by its compact size and robust performance. It weighs only 0.5 kg and has a size of 200 mm. It can fit in a small case and be connected to a laptop, making it easy to carry and use anywhere. It can also perform precise 3D measurements with an accuracy of up to 0.02 mm.

A 3D portable scanner consists of a projector and cameras that are arranged at a fixed angle. This is essential for producing reliable data about the object being scanned. The system calibrates itself by observing a special plate in different positions, which allows it to determine the angles between the cameras, which may have changed due to temperature variation or shocks.
Types of 3D scanners
There are two main types of 3D scanning tools, which differ in the way they project light onto the object and capture the resulting images.
Structured–light 3D scanners
Structured-light scanning devices use an LED projector to project a pattern of lines onto the object, while two cameras record how the lines are distorted by the object’s shape. Some of these 3D scanning tools need to be mounted on a tripod or a robot arm, and the measurement is done in a static way, meaning that neither the portable 3D scanner nor the object can move during each scan. This can limit the mobility and flexibility of the 3D product scanner, especially when measuring large or complex objects or in industrial settings where there may be vibrations or interference.
These 3D product scanners have a wide range of applications in non-industrial areas, as they are suitable for scanning medium-to-large objects with rich features and colors such as cultural relics, statues, and even human bodies. The data they acquire are high-resolution and rich in details.
Scantech’s iReal 2E is a portable 3D scanner that uses structured light to capture high-quality 3D data of various subjects, from humans to objects with textures and colors. It is a professional tool for 3D engineers, designers, and researchers who need to create 3D models for industrial, artistic, medical, or human body applications.

Laser 3D scanners
Laser 3D scanners use laser emitters to project lasers onto the object, while two cameras record the lasers reflected to determine positions in space. Most of these 3D scanners are handheld, and the measurement is done in a dynamic way, meaning that the 3D scanner and the object can move continuously during the measurement. This makes the 3D scanner more mobile and adaptable, as it can measure objects of any size or shape or in any location or environment. Being not sensitive to interference, laser 3D scanners can adapt to different measurement conditions. They are suitable for 3D scanning industrial parts such as wind turbines, automotive white-in-body, and hydro-power equipment.
The principles of operations of the 3D scanner
Reference points are used to create a stable and accurate point cloud. These are markers that are placed on or around the object, for example on a reference frame or holder, so that the system knows how to orient itself in space and how to position the measurement data in the coordinate system. Some systems, like the TrackScan-Sharp optical 3D measurement system, use an external tracking device, which makes the measurement possible without reference points and with high accuracy. Other systems use geometric or color features of the object to combine individual scans.
3D Data processing and analysis
The digitization process, or 3D scanning, involves moving the scanning head along the whole geometry of the object so that the system sees all the surfaces that we want to analyze. Since there are many external factors that can affect the accuracy of a 3D scanner, such as temperature changes, shocks, external light sources, material properties and reflections, some information about the same surface can be recorded by multiple points. These are raw point clouds of all coordinates captured by the system, which are then polygonized, meaning that they are automatically optimized and averaged, resulting in a uniform and precise STL triangle mesh that can be used for further analysis, such as quality control or product development
3D scanning is a powerful technology that can enhance manufacturing processes by providing accurate, fast, and comprehensive data about objects’ geometry and features. It can also enable new possibilities for creativity and innovation by transforming physical objects into digital models that can be manipulated and modified in various ways.
In the next section, we will explore the applications of 3D scanners and what benefits they can bring to designers, manufacturers, and professionals. (To be continued)
Click on the following link Metrologically Speaking to read more such case studies about the Metrology Industry.


