An Automotive OEM used Perceptron’s in-line metrology solution to measure all closure panels for their manufacturing plant. High variation was detected and guided the engineering team where to investigate to contain and solve their alignment problem.
Using a sampling methodology to measure one door per shift, the variation displayed above would not be recognizable. The first symptom of an issue would be complaints from workers trying to fit the doors on the final vehicle, resulting in resources being tasked to investigate. The first step of their troubleshooting investigation would be gathering data to isolate the source of the problem. In this case, removing additional doors from the production line and measuring them with a CMM would be required to gain insight, likely taking several days to arrive to the conclusion that is immediately available with 100% in-line measurement.
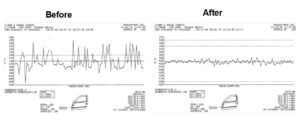
The automotive OEM installed a Perceptron system to measure all of their closure panels. The hinge and latch were also part of the measurement routine. In this situation, the lower hole of the upper door hinge showed high variation in the U/D direction, as displayed in the run chart above. The hinges were attached to the same station but were controlled by different tooling details. An investigation of the U/D locators found that there was a gap between the door and the datum, causing interference with the U/D pusher. After eliminating the interference and increasing the pusher air pressure, the variation was reduced significantly as seen in the two charts below.
Having access to 100% data is priceless when things go wrong. It enables the engineering team to make quick, informed decisions on where to start. In the absence of data, management must decide whether to keep producing as they troubleshoot or stop production until they have clarity – either decision could result in significant incurred costs.

Click on the following link Metrologically Speaking to read more such case studies about the Metrology Industry.


