Worldwide emissions and energy regulations continue to tighten. In response, the automotive industry is attempting to meet these demands by introducing vehicles with greater efficiency, greater range, as well as reduced particulate emissions. Today’s consumers are also asking for more value at the pump as fuel prices become highly variable.
These concerns are helping to advance manufacturing methods to produce smoother surfaces on standard, as well as newer, materials, contributing to the downsizing of engine dimensions while retaining the same amount of output power. The key to maintaining these high power outputs is tight compliance with specifications and tolerances, which is enabled by non-contact metrology systems employed on the production floor.
Non-Contact Metrology
Zygo is the market leader in non-contact 3D optical profilers, used in many aspects of production and manufacturing of metal components. Used on the production line, in metrology labs, or integrated into factory automation, Zygo technology enables fast and precise measurements allowing engineers visibility to process stability for almost instant corrective action.
When compared to traditional contact metrology methods, Zygo instruments stand out as the best solution in gathering surface texture and form information. As the system is intrinsically non-contact, no damage from the measurement system occurs on the surface under inspection. In fact, with no features contacting the surface of the sample under test, no concern is needed if the stylus probe is worn or broken. As the Zygo optical profiler is calibrated to the wavelength of the high brightness LED light source, the system will only require calibration when the LED burns out, in about 100,000 hours!

Typical roughness and waviness plots of common automotive sliding surfaces. Source: Zygo
The advantages the Zygo Non-contact 3D Optical Profiler brings to customers is confidence in metrology. With built-in system enhancements such as SureScan™, external vibration is mitigated or eliminated, providing precise and highly reproducible results. The oversampling measurement mode provides the capability of acquiring data on even the roughest of samples as well as produce quality data from highly sloped parts.
Another advantage Zygo 3D Profilers bring with its inherent measurement technology, coherence scanning interferometry, or CSI, is exceptionally high vertical measurement resolution, down to 0.2 nanometers. As opposed to other non-contact measurement technologies, this high resolution is independent of the microscope objective performing the measurement, ensuring high-quality measurements with Zygo’s full suite of interferometric objectives.
Applications
Fuel Injection
When examining vehicle emissions, from either gasoline or diesel-based, the injectors in engines play a significant role in the reduction of particulate matter as well as other noxious fumes. These artifacts of combustion are primarily under the control of the conical seat which acts as a ‘fuel gate,’ that triggers the spray of the fuel into the combustion chamber. If this conical seat is not correctly ground, the mating pin or valve ball can allow extra fuel into the combustion cylinder. Zygo technology assists injector manufacturers by measuring these hard to reach conical seats for proper roughness and angle.
Gears
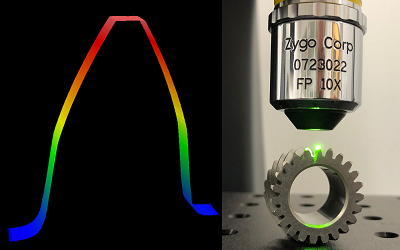
All vehicles contain some set of drivetrain gears which help transfer energy from the vehicles power source to the wheels. The frictional effects at gear tooth contact can dramatically affect the overall efficiency of the vehicle, therefore the gear tooth surfaces are being produced with ever decreasing surface texture, or roughness, facilitating smoother gear operation and lower frictional sliding forces. To monitor these surface textures, Zygo Optical Profilers can acquire surface data from the root to the tip of the gear, providing valuable information to the engineer on the condition of the grinding and polishing wheel. With this information, the process engineer is able to determine better when these wheels need to be reconditioned or replaces, optimizing gear production yield and maintaining specified surface texture.

Demonstration of high slope acquisition capabilities of Zygo’s CSI technology. Source: Zygo
Summary
Advances in the industry are apparent when looking at global standards activity. While 2D profile standards ISO 4287 and ISO 4288 have long been the norm, ISO 25178-1:2016 is the first international standard that considers measurement and specifications of 3D surface texture, describing measurement technologies and calibration methods, standards and software.
Zygo’s 3D Optical Profiler instruments enable precise, quantitative, ISO-compliant, non-contact surface measurement and characterization of micro- and nano-scale surface features, capturing up to one million data points in seconds. Zygo’s advanced application team assists you in choosing the correct optical profiler system depending on your application’s specifications, speed requirements, vertical range, and automation.
Attaining the highest manufacturing standard requires the production of surfaces with tight specifications. For manufacturing and quality control to maintain today’s advanced automotive manufacturing technologies, Zygo’s 3D Optical Profiler will increasingly play a significant role in assisting high performance, high-quality components.

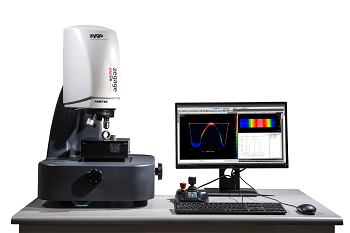
Zygo’s desktop non-contact 3D Optical Profiler, ZeGage™ ProHR. Source: Zygo
Visit Zygo to discover how advanced metrology solutions can provide you with improved quality and process control.


