This article has been written by George Schuetz, and is being reproduced here.
One of the great characteristics of mechanical comparative gages is that they can last for decades out on the shop floor.
One of the great characteristics of mechanical comparative gages is that they can last for decades out on the shop floor. Clean them up a little, wipe off the crud, and they’re good to go for another calibration cycle. But beware! One of the Enemies of Measurement is at work here trying to steal your gage’s performance and influence its readings.
This enemy is known as Wear. For older gages, wear is probably one of the most common sources of error and is also the one that seems to get ignored the most. Wear is always present, though it may appear in different ways. It does not often cause catastrophic error, but may eventually contribute to it. Nor is it like the enemy Looseness, which shows itself as inconsistent readings and may be attributed to wear. Wear is a slow moving enemy that over time tends to show up in two areas: in the pivots, bushings and plungers that transfer the part displacement; and in those areas that touch the part, the anvils and contact points. The latter is the most influential in terms of causing the gage to have a bias in its readings and offering the wrong part size for the user.
Wear and dirt seem to go hand in hand. Dirt causes wear almost like a lapping material is purposely used to finish a part. So obviously, one way to control wear error is to keep the gage and part as clean as possible. But even with the cleanest part and contacts, the simple rubbing together of their surfaces will cause eventual wear on the contacts of the gaging.
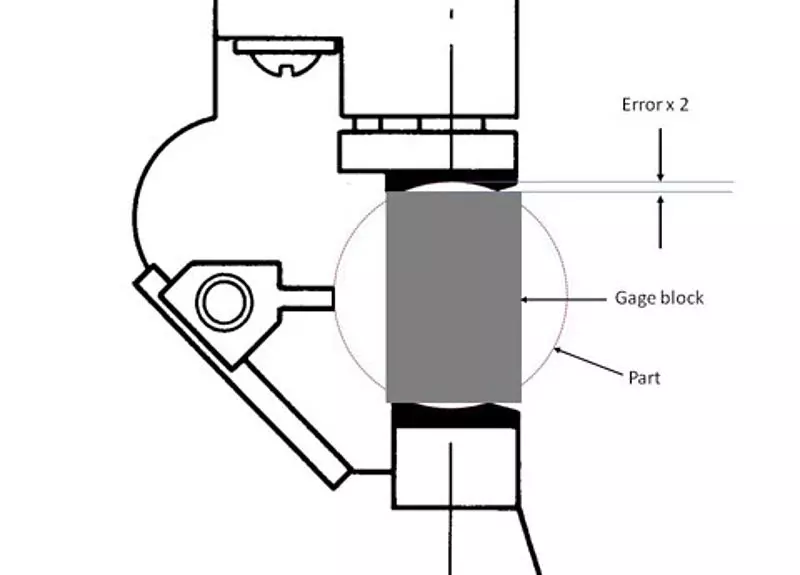
Let’s look at a snap gage application where the snap gage is measuring a shaft diameter. After thousands of parts are placed between the anvils of the gage and rotated to measure for diameter variation, there is a very good chance that the anvils will start to show a hollowed out area on both the top and bottom anvil. This can cause two issues. When the snap gage is adjusted to a slightly larger or smaller size, the anvils may not sit on the maximum diameter any longer, but rather partway up on the hollow in the anvil. Thus an offset in size is created. Or — while not the best practice — some users may not have a master disc to set the gage zero setting, but use a gage block instead. Since the gage block sits on the anvil flat and the part may sit in the worn hollow section of the anvil, bias is introduced and errors are seen.
A similar example of a wearing influence would be that of a round contact measuring against a flat anvil. This would be a typical wall thickness application. As the spherical contact eventually wears flat, the contact no longer measures the minimum thickness. Rather, it starts to read a chord on the part relative to the outside diameter and a larger thickness reading is recorded.
Besides cleaning the measuring surfaces, what else can be done to reduce wear? Using contacts made of different materials can help. Most often, hardened tool steel is the material of choice for wear areas. But alternatives like sapphire, chrome or tungsten carbide have great wear resistance. The only concern here is to be sure that the new materials don’t react poorly with the part and cause scratching.
With wear creeping in like this, the question arises as to how often the gage should be checked for wear? This is a rather difficult question. There are many influences including the material of the parts, the number of parts measured, the gaging pressure, whether the part is rotated, etc., but as is always the case, a little effort and keeping good records will dictate what the wear patterns may be and how often the gages need a wearing inspection.
Finally, what is allowable wear? Again, knowing the situation makes all the difference. If the gages are designed for millionth measurement, then no wear can be afforded. Replacements must be made at the first sign of influence. But when large tolerances are being measured, it is not that critical. Typically, 5% of part tolerance may be allowed for wear.
The thing to remember is that when using any gage, think of wear as an enemy, one that is always trying to steal an extra micron. Set your sights on theft prevention and stop wear before it happens.
While it is not the best practice, some users may not have a master disc to set the gage zero setting, but use a gage block instead. Since the gage block sits on the anvil flat and the part may sit in the worn hollow section of the anvil, bias is introduced and errors are seen.


