Utilising FARO’s QuantumM FaroArm, Kyokuyo was able to improve its manufacturing efficiency by shortening processes and reducing manpower needs. Article by Kayoko Muranaka, FARO Technologies.

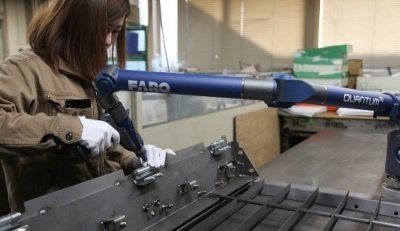
Figure 1: The FaroArm is lightweight and easy to handle, even for women who are more petite.
From construction machinery to railroad vehicles, and even an ATM chassis, parts produced by Kyokuyo Metal Industrial Co. Ltd (Kyokuyo) are incorporated into various devices that play integral parts of our lives. In recent times, a surge in demand for construction machinery and railway infrastructure, due to the upcoming 2020 Tokyo Olympics, has led to an increase in business for Kyokuyo.
The company’s main production base in Yachiyo is equipped with a turret punch press, laser beam machines, and various sheet metal processing machines. The factory focuses on cutting and bending works for plates of varying thicknesses. Besides machining, Kyokuyo’s integrated production system also includes pre- and post-machining processes—such as material arrangement, welding, painting, assembly, finished products inspection, and packing. In order to maintain the quality of products while hastening the production process, regardless of work volume, Kyokuyo focused on reducing total lead time by utilising 3D measurement instruments.
A Perfect Opportunity for Introducing 3D Measurement Technology

Figure 2: Measurement results collected by the FaroArm are clearly presented in easy-to-read visuals on the FARO CAM2 Software.
Recently, Kyokuyo took on new business from a major construction machinery manufacturer and it became clear that highly accurate inspection would be necessary in order to meet the stringent quality control standards of the client.
Kyokuyo produces a large variety of parts in low quantities, and in many different shapes and sizes. In the past, the company’s Quality Assurance Department used hand tools such as calipers, micrometers, and height gauges to inspect finished parts. However, substantial amount of time and effort were required for this process, at times requiring up to two people to carry out the inspection of just one part.
Working with the new construction machinery customer created an opportunity for Kyokuyo to introduce 3D measurement technology to its processes.
“We had three main criteria for evaluating various 3D measurement instruments — weight, operability, and aftersales support,” shared Mr. Daisuke Matsumoto, Chief of the Quality Assurance Department.
Kyokuyo decided to purchase the latest FARO QuantumM FaroArm when it was released. The new QuantumM FaroArm boasted superior functions while meeting Matsumoto’s three main evaluation criteria.
Matsumoto revealed, “We had tried out many different 3D measurement instruments, and eventually chose the QuantumM FaroArm as our best option. The FaroArm’s in-built counterbalance system provides effortless, stress-free usage. Coupled with its lightweight and ergonomic design, which surpasses that of products in the same category, the FaroArm was very easy to operate — even with one hand. The meticulous service and support we received from FARO’s representatives also affirmed our decision to purchase the FaroArm.”
Now, with the FaroArm, Kyokuyo’s operators can carry out the finished product inspections more efficiently and with much less effort. Additionally, the FARO CAM2 Measure 10 software can be programmed to allow for sequential measurement of fixed points, increasing the efficiency of inspection processes.
Amazingly Lightweight, Easy to Use, and Accurate

Figure 3: Complex geometric tolerance can be easily measured, and anyone can simply repeat the procedure by creating a measurement program.
Misaki Fujiwara, the key personnel conducting these measurement tasks, shared her appreciation for the FaroArm, “Other 3D measurement instruments did not feature a counterbalance system, so I had to use both hands to hold those tools. Comparatively, the FaroArm is much lighter and easier to use, allowing ladies like me to measure and inspect parts with just one hand — as not a lot of arm power is needed. These are very helpful features.”
However, the lightweight feature would have been pointless if the FaroArm did not offer the stringent accuracy required by Kyokuyo’s client.
Reflecting on his previous experience with hand tools, Hideaki Shinsato from the quality assurance department said, “When we were using hand tools for our inspection tasks, the measurement process was tedious, and the accuracy of results was also highly dependent on each personnel’s competency.”
The introduction of FaroArm eradicated such concerns. The quality assurance team gained greater confidence in their measurement results. In addition, they could now also offer objective measurement data to inform the staff on the shop floor of the exact improvements required. With this, the reliability of their quality assurance also increased substantially.
Significant Reduction of Time and Manpower
The FaroArm did not just increase the quality of Kyokuyo’s products. Since using the FaroArm, the company has dramatically reduced their total lead time from design to delivery. Inspection tasks that used to take an hour and two personnel to complete now takes only five minutes and just one personnel, regardless of the size of the object inspected.
With a large variety of parts that require inspection, reducing the number of personnel needed for one task allows simultaneous work on other tasks, thereby increasing productivity significantly.
“We’ve observed unquestionable improvements in accuracy and efficiency,” concluded Matsumoto. “We’re impressed with the quality of FARO’s products and going forward, we’re keen to introduce a laser tracker as we have some projects that require the measurement of larger parts. We believe we can broaden the scope of our business if we cater for both contact and non-contact inspection.”


