ABOUT THE AUTHOR :-
Saper Sahbaz
As a customer acquisition specialist at Mapvision, Saper builds awareness in the industry about how advanced capabilities in quality inspection help manufacturers overcome their major operational challenges. He holds an MBA in Strategic Marketing and a B.Sc. in Industrial Engineering with experience in precision machining, industrial project management, data analytics, strategy, and communications.
Vision systems for in-line quality inspection have evolved significantly in the past decade, helping manufacturers to take a step forward from mechanical and tactile solutions such as CMMs, checking fixtures, and gauges. However, we have still been far away from fully digitizing and fundamentally changing in-line inspection – not to mention transforming quality management in a broader sense.
For example, as manufacturers, we still rely on sampling since 100% in-line inspection is feasible only for the most critical features. Similarly, we are still unable to have a granular, real-time view of our process capability – instead relying on statistical process control (SPC). Quality control and quality containment still require manual and physical processes as in the case of, for example, manual sorting activities. We are still far away from achieving the ideals of smart manufacturing such as zero-defect manufacturing, extensive operational flexibility, and immediate response times to quality incidents and change requests.
By introducing a fundamentally new technological approach in contrast to conventional vision inspection technologies, multi-camera inspection technology addresses these challenges by providing capabilities that have not been possible before, such as:
- Real-time inspection of hundreds of part features for each manufactured part within production Takt time
- Conducting new inspections on parts that are already shipped by using part digital twins
- Increased operational robustness through self-diagnostics algorithms for measurement accuracy.
These capabilities together enable manufacturers to take a step into the future by, for example:
- Verifying the quality of all features for each part at the moment of production to contain all defective parts, without having to relying on sampling
- Getting real-time feedback on process capability to take immediate corrective actions instead of backtracing through statistical process control
- Conducting sorting activities fully virtually and immediately, thus cutting costs of recalls and airfreight for replacement parts
- Avoiding system downtime and measurement errors even in case of sensor failures
However, to fully grasp how multi-camera technology delivers its promises, we first need to take a look at the challenges conventional technologies face.
The Challenge with Conventional Vision Inspection Technologies
Photogrammetry – the science of conducting measurements on photographs – lies at the core of all vision inspection systems. Early attempts at using photogrammetry for vision inspection were concerned with simple problems such as focusing on a particular point of interest (i.e. an inspection point) and using the basic principles of photogrammetric triangulation to extract 3D coordinates and conduct measurements for that given point. While vision inspection systems have significantly evolved from their early versions, the fundamental technological approach hasn’t changed much from these early attempts.
Today, these systems – also called sensor systems – still mainly consist of a camera and an illumination source, most often a laser [Image 1]. As in earlier applications, they still need to inspect each inspection point one by one. This is done either by moving the sensor from one feature to another as in the case of robotic sensor systems (or robotic measurement systems, RMS) or by adding a fixed, dedicated sensor around a frame for each feature, as in fixed sensor systems.
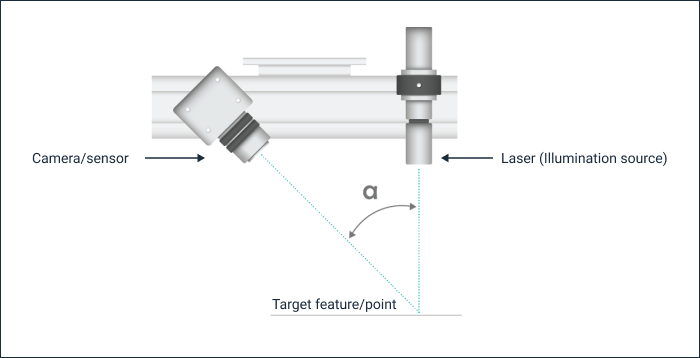
Image 1: Conventional sensors commonly consisting of a camera and an illumination source only focus on a given point at a time
However, relying on basic photogrammetric principles and conducting inspections one by one for each feature with a single sensor come with significant constraints such as:
- Limitations on number of features that can be inspected 100% in-line for each part: Each additional feature to be inspected adds almost linearly to the inspection cycle time, putting a cap on the number of features that can be inspected for each manufactured part. As such, manufacturers still need to rely on sampling.
- Limitations on reliability and robustness: Any sensor contamination and sensor failure translate as measurement error and system downtime
- Limitations on flexibility: Adding new inspection points – or updating the inspection program for engineering change requests – means robot reprogramming or manual additions and adjustments to sensors
Multi-camera inspection technology eliminates these challenges by fundamentally changing the underlying working principles through introducing powerful machine vision and advanced photogrammetric algorithms into the mix. While conventional technologies rely on observing single points one by one with a single sensor, multi-camera inspection technology observes the whole part within seconds and conducts all inspections fully digitally by treating the collected data as a product digital twin.
Introducing Multi-Camera Inspection Technology
Multi-camera inspection is a “photography-based” inspection technology that captures photographic data from the whole part and treats the collected images as product digital twins. All inspections and measurements are then conducted directly on the digital images instead of triangulating each feature one by one on the physical part.
The technology typically consists of 30 to 90 digital cameras that are located around an inspection chamber [Image 2]. In some cases, there can even be more than 90 cameras. Each camera observes the whole part or large sections of it at once [Image 3].

Image 2: Multiple fixed cameras are placed around an enclosed inspection chamber

Image 3: Views of the same part from different cameras, each camera observing almost the whole part in this example for a cross car beam.
Each observation provides views of multiple features at a time [Image 4]. Moreover, observations from different cameras provide multiple views of the same features [Image 5]. Altogether, the digital images aggregated from each camera provide a complete view of the whole part.
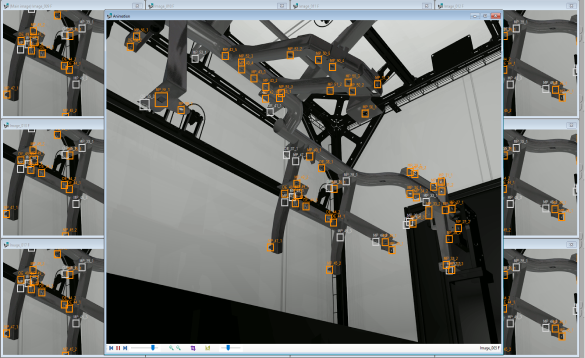
Image 4: Multiple features of the cross car beam is identified by the machine vision algorithms on a single image
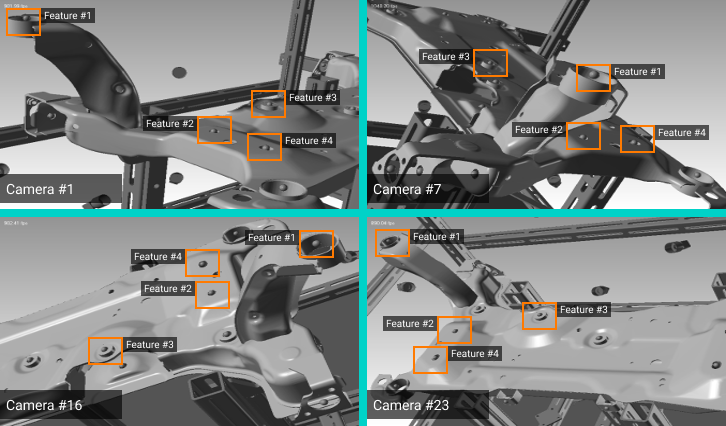
Image 5: Multiple cameras observing the same features from different angles in this example from a front subframe
The collected digital images are then treated as a product digital twin and all measurements and presence checks are conducted on them. Powerful machine vision algorithms detect the features (i.e. the inspection points) on the images as they are specified in the inspection program. Then the photogrammetry algorithms intersect 3D coordinates from the 2D observations made by the machine vision algorithms [Image 6].

Image 6: Inspections are conducted by advanced photogrammetry algorithms for the features detected by the machine vision algorithms
Having multiple cameras to collect data, collecting data from the whole part instead of individual features, and not relying on the physical part once the data is collected create the main differences between conventional technologies and multi-camera technology. These key differences open the door to brand new capabilities that transform quality management and increase operational robustness. While each capability deserves its own deep dive – which we will have in upcoming articles – here we will shortly go through the main ones.
100% x 100% In-Line Inspection
Since multi-camera technology observes the part as a whole and uses machine vision to identify features, it can identify and inspect multiple features at once. As such, multi-camera technology can inspect each part in real-time for hundreds of features – enabling manufacturers to replace sampling and statistical process control with deep dive, real-time data for each part and feature.
Retroactive Inspection
Since the technology collects data from the whole part and treats the data as part digital twins, it is possible to define and run new inspections on the parts at any point in time – even if the parts are not physically available anymore. This enables manufacturers to, for example, conduct sorting activities fully digitally with Virtual Sorting or handle customer warranty claims confidently with evidence for each part.
Image 7 shows how the process of multi-camera technology translates to 100% x 100% In-Line Inspection and Retroactive Inspection capabilities.

Image 7: The multi-camera inspection process translating into two core inspection capabilities through complete digitalization: 100% x 100% in-line inspection and retroactive inspection
Operational Flexibility
One of the operational hurdles in quality inspection is adding new inspection points to the measurement routine and/or updating the measurement routine for engineering change requests (ECRs). The fully digital nature of multi-camera inspection makes it possible to handle such changes completely through software without any mechanical efforts. The operators can simply introduce the new inspection points and part variants to the inspection routine in a software environment by marking the new points on the CAD of the parts within minutes.
Camera Redundancy
Using multiple cameras to observe the part creates an inherent feature called camera redundancy, meaning that each feature is always observed by a redundant number of multiple cameras. Therefore, even in case of an unlikely camera failure, the system stays operational without causing any downtime and continues to deliver reliable results without any compromise in measurement accuracy and precision.
Self-Diagnostics for Measurement Accuracy
Conventional technologies rely on the assumption that the calibration of the sensors are adequate. Since each measurement is conducted by a single sensor, they also don’t have a benchmark to evaluate their measurement performance at the moment of inspection in real-time, making self-diagnostics impossible. However, in addition to mechanical and technical issues, there are multiple other factors on the production floor that may affect measurement performance such as dust and ambient light. Since conventional vision inspection systems cannot evaluate their own performance, the inspection errors either go unnoticed or cause system errors.
However, this is not the case for multi-camera technology. Relying on multiple cameras to intersect 2D coordinates into 3D coordinates by using photogrammetry enables the system to account for uncertainty within an accepted margin of deviation and confidence interval and conduct self-diagnostics. As such, the system can notify the operator if the 3D coordinates become unreliable instead of letting errors pass through.
The future of manufacturing is digital – the future is now
Multi-camera technology offers the next step toward manufacturing smarter by fully digitizing and fundamentally changing the rules of the game for in-line inspection. Through 100% x 100% in-line inspection, retroactive inspection, and unparalleled robustness, it breaks through constraints faced by manufacturers today and opens the door for the future.
Look forward to our next articles on multi-camera inspection technology – in which we dive deeper into the many benefits this new, exciting technology delivers.
Want to learn more about the technology behind multi-camera inspection technology? Join our upcoming webinar In-Line Quality Inspection with Multi-Camera Technology on March 16th or March 23rd.


