Innovations in automotive industry bring new opportunities, challenges to quality control.
With the increasing popularity of electric vehicles (EV), a lot of engineers and quality control specialists are facing new challenges when inspecting parts. Whereas traditional cars had primarily mechanical parts, EVs now feature complex electrical-mechanical devices controlled by software. Although they have fewer moving parts than gasoline vehicles, EVs have myriad complicated subsystems—all of which affect the performance and handling of these vehicles.
In order to improve product safety and production throughput, more EV manufacturers are turning to automated quality control systems in plants and right on their production floors. Anomalies can be instantaneously reported back to the engineering staff for quick corrective measures. Speeding up inspections leads to more throughput and a faster time to market.
Inefficient quality control, lack of skilled labor slow throughput
In today’s tough labor market, there is a clear lack of skilled labor with the experience and expertise required to perform effective quality control inspections.
Manual inspections or inspections with conventional coordinate measuring machines (CMMs) take time. Both are prone to operator efficiency levels and human error. CMMs are often located in a dedicated lab, which means there is a lot of programming, setups, and back-and-forth with the production line. CMMs are not very fast, either, and require metrology experts to operate. All of these factors can greatly slow the execution of quality control inspections.
Complex EV parts and production types beget complex inspections
In addition, because EV parts and subsystems can be more complex than traditional vehicles, inspections may require extra steps. For example, some conventional inspection technologies may be very sensitive to surface finishes; they may require surface preparation, such as the application of powder, to perform inspections properly. This preparation takes additional time, can be difficult to predict, and if not done correctly, can impact inspection accuracy.
Furthermore, many EV parts are not reworkable. That means if inspectors miss a quality issue, and a noncompliant part is added to a production line, that line could immediately come to a standstill. This is why EV manufacturers often require 100-percent measurements on finished parts before going into series production within a specified cycle time.
It is also important to note that the automotive industry is moving toward high-mix and low-volume production types for EVs. This means that quality control teams must constantly change a CMM’s programming, which again, requires time and expertise from an experienced metrologist.

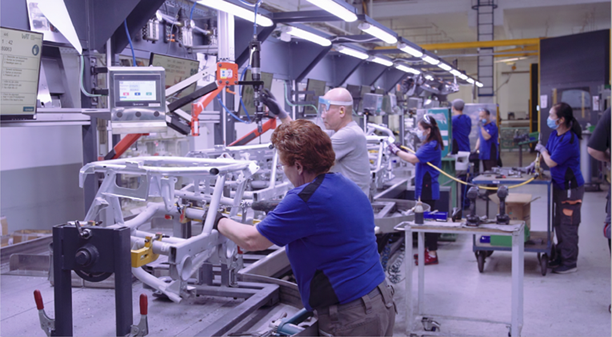
The engine mount’s assembly line. Credit: Walter Automobiltechnik
Striking the right balance between speed and accuracy
As mentioned before, traditional manual or CMM inspections are dependent on a technician’s skill, which can compromise data accuracy, reliability, and repeatability. CMMs in particular are also very sensitive to vibration, dust, and humidity from the surrounding production environment; in fact, CMMs often require an isolated concrete slab to guarantee inspection accuracy. This significantly adds to the cost and complexity when deploying a new CMM.
A word on accuracy. Conventional CMMs are very accurate—often too accurate for their use. For example, the tightest tolerances you will find in stamping or welding for surface profile, trim points, etc. are +/– 0.5 mm. It’s not uncommon to even see +/–1.0 and +/–1.5 mm. CMM accuracy (up to few microns) is 10 to 100 times more precise than the smallest of tolerances. This means that CMMs are often too precise for some applications. Therefore, CMMs should be used only in cases where their accuracy is really needed and let other, faster technologies inspect the majority of parts.
Solution: Automated quality control increases EV manufacturers’ throughput
Creaform’s R-Series of 3D scanning solutions for automated quality control are ideal for EV manufacturers looking to increase their inspection efficiency without compromising on accuracy or requiring skilled technicians.
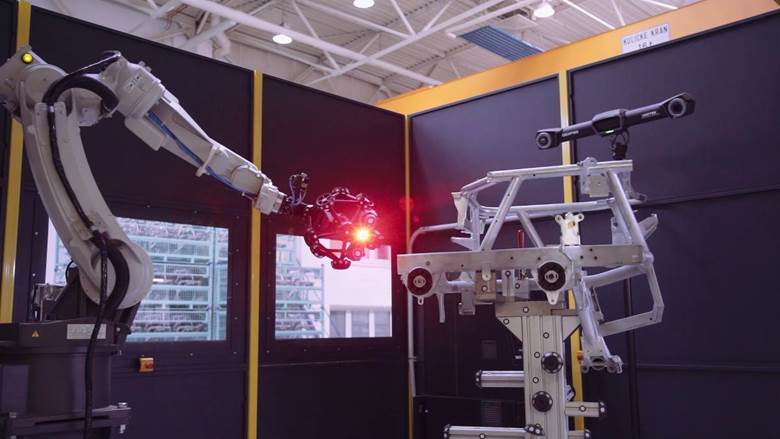
The MetraSCAN 3D-R is a powerful robot-mounted optical CMM scanner that can be implemented within any automated quality-control process for at-line inspections. No matter what the production type—high-mix and low-volume, or low-mix and high-volume—the MetraSCAN 3D-R can be set up as a turnkey solution with a C-Track optical tracker in a CUBE-R cell or within a custom configuration.
High productivity
Quality control teams can capture up to 1,800,000 measurements/second regardless of part size, surfaces, trims, and geometric features.
Multitasking
With both the MetraSCAN 3D-R and VXelements, Creaform’s 3D software platform, inspectors can simultaneously carry data acquisition and analysis to speed up throughput.
Robust industrial design
The MetraSCAN 3D-R is great for any production environment, and quality control teams can achieve shop-floor accuracy of 0.025 mm (0.0009 in), regardless of instabilities, vibration, and thermal variations.
Automatic calibration
With this scanner, there’s no accuracy drift over time, despite accelerated throughput.

Automated quality control of the engine mount using the MetraSCAN 3D-R. Credit: Walter Automobiltechnik
Benefits: Get accurate inspection results fast with automated quality control
Whether implementing a turnkey or customizable automated quality control solution with MetraSCAN 3D-R, EV manufacturers can conduct faster inspections with the right level of accuracy and without technically trained staff.
What’s more, MetraSCAN 3D-R can be integrated within a production line quickly and without lengthy training or significant downtime.
Quick implementation and training
Thanks to its design and ease of use, MetraSCAN 3D-R can be installed in as little as one week. Technicians of any skill level can be trained in just one day. This tackles manufacturers’ human resources headaches and decreases downtime to implement an automated quality control system.
100-percent complete dimension inspections—faster
As EV manufacturers are pressured to release their innovations to the market faster, automated quality control solutions like the MetraSCAN 3D-R meet the need for data-acquisition speed without sacrificing measurement accuracy, reliability, and repeatability.
Some manufacturers use the MetraSCAN 3D-R to slash data-acquisition times for inspections from hours to mere minutes, confident that the approved parts are manufactured according to spec and industry regulations. Increased inspection capacity ultimately contributes to increasing throughput.
Walter Automobiltechnik GmbH, a German part and accessory supplier for big OEMs in the automotive and motorcycle industries, recently added two MetraSCAN 3D-R systems to its customized automated quality control system to assess the quality of an engine mount for an electric car and maintain a short cycle time.
The engine mount was made using welded structural parts with complex geometries, which made them difficult and time-consuming to inspect. The mount was also developed using reflective galvanized steel, which compounded the inspection problem.
By using the MetraSCAN 3D-R, which enabled the quality control team to capture a high level of measurements in seconds, Walter Automobiltechnik was able to drastically reduce inspection times on the engine mount from 1 hour 30 minutes to just 8 minutes. Walter Automobiltechnik could not have achieved that level of throughput with a traditional CMM.
MetraSCAN 3D-R enabled the company to reduce its shop-floor footprint due to the use of a smaller robot that was capable of covering the entire part. This saved the parts supplier money on the investment of the robot. Because the integration took up less space, there were fewer changes on the production floor as well.
The company is planning to add more MetraSCAN 3D-R optical CMM scanners in the near future to accelerate many of its other production lines.
ABOUT THE AUTHOR

Jérôme-Alexandre Lavoie
Jérôme-Alexandre Lavoie is a product manager at Creaform. He holds an engineering physics degree from Laval University. He joined Creaform in 2007 as an application engineer. After four years of working closely with customers, he became Product Manager with the mandate to develop non-destructive testing solutions using Creaform technologies. Jérôme-Alexandre has accumulated over 10 years of experience in 3D data management and is now in charge of Creaform’s complete portfolio of automated quality control solution.


