
When you 3D scan an object with an optical scanner, there are certain rules and factors that you should know. In this article, we will take the 3D scanning of a jet fighter as an example to explain basic facts and different techniques for the preparation, process, and post-processing of 3D scanning. We’d like to help you navigate the journey of 3D scanning.
Background of the case
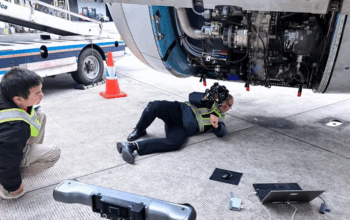
The Soviet jet fighter Mig-19 is the world’s first mass-produced supersonic aircraft. It is 10 meters long with a weight of about 7500kg. The left-wing of the aircraft is in bad condition and there might be some risk of decomposition. The project is to scan the left-wing to reverse engineer it so that engineers can reconstruct the part.
The equipment we use in this case is the industrial 3D scanner KSCAN-Magic. This portable 3D scanner for reverse engineering offers five working modes, large-area scanning, fast scanning, fine scanning, deep-hole scanning, and a built-in photogrammetry system. These functions ensure that the KSCAN-Magic can tackle various 3D scanning tasks with excellent high quality. It can easily capture data of complex surfaces with an accuracy of up to 0.020 mm.
Factors and Techniques
① Preparation
- What do you need to do before scanning?
The key to ensure an optimal 3D scanning is a careful setup. The first step is to calibrate the 3D scanner with a calibration board after long-distance transportation. Then, it is necessary to adjust the scanner according to the ambient conditions and the surface and shape of the object to be scanned.
- Things to consider when scanning outdoors
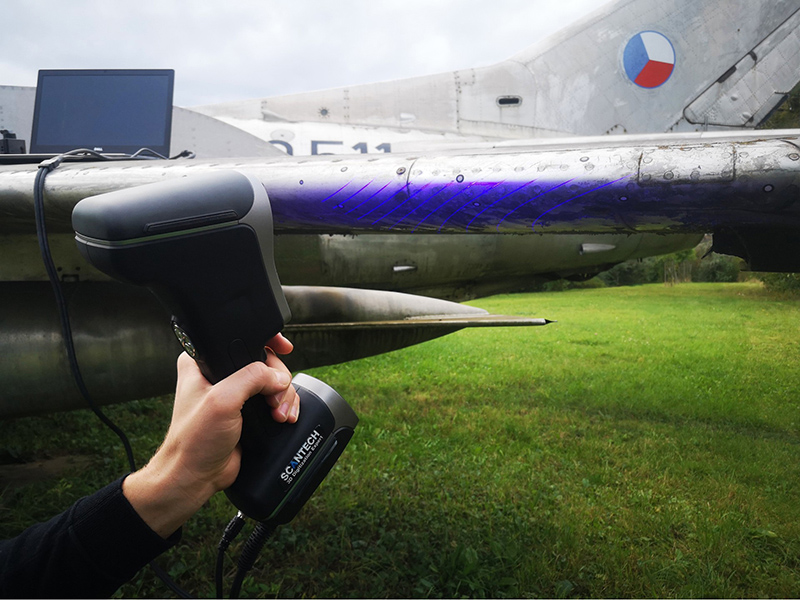
The ambient light may affect the scanning precision and the time of scanning. When it comes to outdoor scanning, traditional scanners that are sensitive to lighting conditions may lead to poor scanning results. In this case, the optical handheld laser 3D scanner KSCAN-Magic is not sensitive to lighting conditions thanks to its blue lasers and powerful algorithm. Due to its short wavelength, the blue laser is more resistant to interference when scanning. This portable 3D scanner can also scan big surfaces in a short time, which helps to capture the 3D data outdoors.

② Photogrammetry
When scanning a large-scale object, the scanning errors accumulate over a certain distance. With large scanning frames and multi-angle positioning, photogrammetry can reduce alignment errors and improve scanning accuracy.
- What is photogrammetry?
Photogrammetry is a measuring technique that takes photographs from different perspectives to extract 3D coordinates and geometries. When it comes to scanning a large object longer than 1 meter, it can improve the precision of positioning of markers and improve the accuracy of scanned data.
KSCAN-Magic is unique in that it combines laser scanning technology with photogrammetry in one system which brings the benefits of stable accuracy also on parts with bigger sizes. As we were not scanning the whole airplane in this case, it wasn’t necessary to use a photogrammetry pattern before the scanning.
③ Markers
- Why should we use markers before scanning?
Markers also known as reference points help the 3D scanner to position and get the 3D coordinates of the object. Therefore, you need to place markers on the object before scanning.
- How to place markers?
It is recommended to place markers randomly and irregularly so that the scanning software can properly find their location. In this case, we placed markers 250 mm – 350 mm apart from each other in most places.
However, on the narrow spots and edges (e.g. wing edge) it is suitable to place them a little bit closer because the edge has a limited surface area and the minimum number of markers in the scanning field must be four.

④ Optimal scanning distance
- What is optimal scanning distance?
Each scanner has an optimal distance that you should have between the scanner and the part that you are scanning. To capture high-quality 3D data clearly, it is essential to ensure that you are at the optimal distance for your scanner.
The movement of the scanner gradually collects data. The scanner moves in such a way that data is scanned from multiple angles for their completeness.

⑤ Resolution setting
- What is resolution?
Resolution describes the minimum distance between captured points at a given scan distance. The higher the resolution, the denser the cloud of scan points. When the details of a 3D model are important to you, you would require a high resolution. If not, low-resolution requirements are suitable for you.
The resolution which we set for scanning these parts was 1.5 mm which gave us enough resolution to capture details available on the surface while maintaining a fast scanning speed. It is recommended to frequently change scanning angles and positions of the scanner to capture data from different directions.

⑥ Postprocessing
- What makes a good scan?
A scan that meets the criteria of your project can be called a good one. The level of precision required for projects varies, which depends on their goals such as 3D printing, digital archiving, quality control, and prototyping. For product development, a good scan can save time required to build a 3D model from the scratch. Designers would clean and edit the scanned data once imported to the design software. Therefore, a bit of missing geometry would not be an issue for them. For inspection and quality control, high precision is a must.
As the engineers aim to reconstruct the left-wing in this case, a high-quality scan with little post-scanning tampering is required.
- How to clear your 3D point cloud?
After we completed the 3D scan, there were some parts of the scan that we didn’t need. ScanViewer that comes with the KSCAN allows us to edit the 3D data. We removed these ‘noise’ points from the point cloud with a few clicks.


- What software can be used?
The scan data can be meshed into a 3D model and exported to common output polygon formats STL, PLY, or as point cloud files ASC, IGS, and TXT.
Summary
These are just a few useful facts and tips on 3D scanning. If you have any questions about 3D scanners, please don’t hesitate to contact us.