In those early days, the Chief Engineer was almost always the Chief Pilot as well. This had the automatic result of eliminating poor engineering very early in aviation. –Igor I. Sikorsky, Aviator and Aircraft Designer
Leave it to Igor Sikorsky, the Russian-American aviator and aircraft designer who laid the groundwork for the first rotary-wing aircraft, to best summarize a common challenge faced in the aerospace industry then – and now: the critical need for aircraft maintenance, repair, and overhaul operations.
Sikorsky’s dry sense of humor notwithstanding, what you don’t want in real-world scenarios, is exactly what the inventor of the helicopter is describing. While it’s important to have an on-their-toes pilot, it’s poor form to problem solve engineering issues while in flight. Ideally the troubleshooting should take place on the ground, long before takeoff (planes) or liftoff (spacecraft).
Today, Maintenance, Repair and Overhaul operations, known in manufacturing as MRO, is a sub-industry all its own.
With an estimated global market valued at $656 billion, forecast to grow to over $800 billion by 2032, it’s incumbent on industry leaders to ensure maximum safety in all aerospace applications. In its broadest definition MRO refers to the processes and activities involved in ensuring that machinery, equipment, and systems are maintained in optimal working condition. That means they are repaired when they malfunction and overhauled when needed to extend their operational life.
Aerospace and 3D Scanning Technology
MRO is essential in industries such as aviation, automotive, manufacturing, and utilities to guarantee the reliability and efficiency of all parts, assemblies and sub-assemblies. Everything from routine maintenance tasks to corrective repairs are covered and involves disassembling, inspecting, repairing or replacing parts, and reassembling equipment.
3D laser scanning technologies, by its very nature, (speed of data capture, accuracy of results, portability, and repeatability of performance), are an ideal toolset for an aerospace industry, aided in part by the new public-private sector renaissance that is literally taking off for the stars.
Now that the industry has in large part recouped its recent losses, the next step is growth. As in any manufacturing application, central to that growth is increased throughput; more parts going through quality control and inspection, faster, accelerating the MRO aviation process. One of key tools in that laser scanning arsenal is the laser tracker.
A Laser-focused Look at Laser Trackers

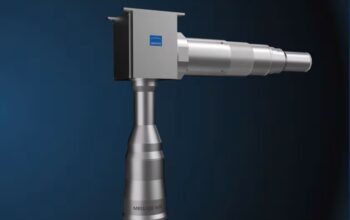
A laser tracker is a precision measurement device designed to measure the exact position of objects in space. Tools like the FARO® Vantage Laser Tracker employ a laser beam to track a target reflector, or a retroreflector. The tracker emitting laser light towards the reflector then measures the time it takes for the beam to return. By continuously tracking the reflector’s position, the laser tracker can determine coordinates with high accuracy. These measurements are crucial for aerospace quality control, alignment, and reverse engineering needs.
Ideal for large-scale applications, specific aerospace examples include:
- Engines: Overhaul and repair of jet and turboprop engines, ensuring performance and compliance with safety standards
- Landing Gear: Maintenance and inspection to prevent failures and ensure safe takeoff and landing
- Avionics: Upgrading and repairing electronic systems for navigation, communication, and monitoring
- Fuselage and Wings: Structural repairs, including fixing cracks and corrosion
- Hydraulic Systems: Servicing components that control landing gear, brakes, and flight control surfaces
Not to be left out, spacecraft, naturally, have alignment and calibration needs too, ranging from thrusters and propulsion systems to solar panels, heat shields, communication systems and a variety of ever-changing and frequently updating scientific instruments.
As with any 3D laser scanning tool, laser trackers are useful in ensuring precision alignment of parts. For the aerospace industry this can include wings/solar panels, fuselage/spacecraft main body, and engine parts (as noted above for airplanes). It can also involve component inspection for the accurate measurement of general wear and tear (low Earth orbit re-entry speeds can exceed 17,000 mph with temperatures approaching 4,500 F.), tooling and fixture calibration (making certain the machines that make the machines are within tolerance), and reverse engineering, creating detailed models of existing parts for replication or improvement.
For NASA’s planned lunar Artemis Missions, three Orion space capsules are currently under construction and a fourth capsule has been ordered. Ensuring four identical spacecraft are truly identical is where a device like a laser tracker can prove invaluable.
Staying on ‘Track’: Hardware-Software Synergy
Beyond applications specific to aerospace there are additional advantages to working with a laser tracker for large part assembly. Chief among them is the device’s general ease-of-use and portability. Unlike a traditional coordinate measuring machine, with a laser tracker there is no need to move the part you’re measuring to the machine. Instead, you can bring the machine to the part. This saves time and increases accuracy as there’s less re-positioning involved. Furthermore, when compared to CMMs, laser trackers have a less-steep learning curve and are safer to use.
In fact, laser trackers like the Vantage make on-site measurement so easy and so fast that it reduces inspection cycle times by up to 75%. In seconds, these measurements can be compared against nominal CAD data so teams can either make informed adjustments or move forward with confidence. As noted above, speed improvements like this increase throughput. Which in effect, supercharges the entire aerospace industry.
There’s also superior software compatibility, namely with the FARO® CAM2® Software as well as many third-party providers. FARO CAM2 Software, however, is designed for specific use with any FARO portable CMM, enabling operators to capture accurate measurements and is ideal for aerospace quality assurance and inspection tasks.
Suited to manage repeat inspection routines, with live trend and statistical process control (SPC) analysis, the software features: the ability to use multiple measurement devices together to measure large components fast, metrology-grade meshing in STL file-format that can be trusted when measuring a golden part (a prototype or sample verified to meet all design specifications and tolerances) and geometric dimensioning and tolerancing (GD&T), a standardized method for identifying in-tolerance limits of form, orientation, and location of features on a part.
FARO CAM2 also offers reporting capabilities that allow organizations to share measurement data and results anytime, to anyone across their organization. In addition, it delivers real-time inspection results in a user-friendly set of adaptable visual reports while providing insight to process variations and alerts. This help avoid time-consuming rework and costly scrap, allowing aerospace companies to improve their maintenance, repair and overhaul operations.
Coming in for Landing

Even with Igor Sikorski’s vast intellect and technological foresight it is hard to imagine that even he would have predicted with any measure of accuracy just how far the world has advanced in the half century since his passing.
Today the aerospace industry has matured considerably. What started with a finicky, prototype biplane and a 12-second, 120 ft. flight in Kitty Hawk, North Carolina in 1903, has in a manner of speaking, (if you consider the Voyager I and II spacecraft) traveled over 15 billion miles and counting. Closer to home, the Federal Aviation Administration reports that its Air Traffic Organization (ATO) handles over 45,000 flights and 2.9 million airline passengers across more than 29 million square miles of airspace per day. That’s over 16 million flights annually. The MRO demands for such a rigorous schedule are staggering, to say nothing of the global fleet.
Of course, miles logged and distance traveled are only two metrics in the aerospace industry’s exciting story. What’s often left out is the behind-the-scenes work; the time, energy and effort that goes into ensuring every aircraft, and every spacecraft is fit to fly. MRO is the sub-industry that makes this all possible.
And 3D laser scanning tools like laser trackers in general and FARO’s Vantage Laser Tracker specifically, are helping radically improve the safety of an assortment of vehicles that take to the sky or space. Not only that, but they are assisting aerospace engineers in their ongoing efforts to reduce rework, waste and scrap, save time and increase throughput so that the industry at large can continue to advance.
Sikorsky may not have predicted the technology of today. But he was more than correct when he praised the human ingenuity behind our near-miraculous products.
“Creative work…remains a tremendously vital factor in the progress of mankind. The work of the individual still remains the spark which moves mankind ahead.”


