WITHIN THE MANUFACTURING INNOVATION PROCESS, METROLOGY HAS PLAYED A PREDOMINANT ROLE.
Quality control has long been an integral part of the production process by contributing to smooth operations and avoiding extra costs. Today, we are seeing significant changes to the industrial metrology market due to the rising demand to collect data for statistical and monitoring analysis. Increased use of cloud services for metrological data management and the rising awareness of industry 4.0 standards are also expected to considerably boost the innovation in handheld gaging.
With the integration of flexibility and automation into the world of metrology, dedicated benches are now substituted with flexible benches. In addition, the measurement process is continuously improving to become more user-friendly, due to significant improvements in software development and user interfaces.
The automotive end-user industry is often expected to set the benchmark for other market sectors. The increase in competition and the requirement to comply with international quality regulations have led to a wide demand for quality control and inspection systems for the traditional automotive field, as well as throughout all manufacturing industries.
The Demands Of High Productivity, Lower Costs
The Ford Model T is the iconic representative of mass production manufacturing from over a century ago. This manufacturing marvel reached the target of reducing manufacturing costs of a complex good to a more affordable level. To achieve this target, all cars were identical with very few options available. As famously quoted by Henry Ford, “You can have it in any color you want, as long as it is black.”
Over the last century, car manufacturing has changed significantly. Yet today, engineers are facing the same task of keeping costs low and delivery short, while allowing for a wide range of options and alternatives. Even if millions of cars are produced, each one could be different by some small detail. “Push” and “Pull” manufacturing models are combined to provide a successful strategy to gain global market share and maximum personalization.
Within the manufacturing innovation process, metrology has played a predominant role. Although production processes have become increasingly precise and automated, industrial production remains (by definition) affected by error. For this reason, the major players in the metrology market provide not only technical modernization of handheld gages, but also shift the focus to find new ways of integrating the features of these instruments to the respective production systems where they are used.
The automotive industry has been at the forefront of manufacturing technology, from the introduction of the assembly line to lean manufacturing principles. With lean production, automotive manufacturers and suppliers now see industrial metrology as a way to increase production efficiency, reduce costs, and shorten time to market.
The most advanced automotive OEMs are working to automate inspection plus integrate metrological data with product life-cycle management systems, statistical process control (SPC), and supply chain management software. This information helps in finding new ways to reduce production time, minimize waste, and improve product performance.

Handheld Gaging In Today’s Environment
The world of handheld gaging has evolved over the course of its history. In a market where competition has been a challenge, automotive manufacturers need fast, accurate, and reliable metrology equipment.
- Fast – Time is money. In a competitive environment, the cycle time of a production line cannot be affected by the measurement time.
- Accurate – The permissible manufacturing tolerance of mechanical components is continuously being reduced to suit the demand of very precise assembly and reduced noise.
- Reliable – Gaging is increasingly being performed on the shop floor, and not in the safe environment of a laboratory.
Gaging solutions are available in the following varieties:
Attribute Gages – Functional gages that are dedicated to a specific characteristic and tolerance. These gages are straightforward and can provide a quick “Pass/Fail” result, without providing a numeric value. They cannot be used to monitor process compliance (for example, tool wear) or to provide statistics.
Flexible gages – Variable gages (for example, a caliper or a micrometer) that can provide the numeric value of a characteristic. These gages are commonly used because they can offer a larger measuring range. However, they may require additional training to better ensure accurate measurement.
Dedicated Variable Gages – Precise measuring tools designed to inspect a specific characteristic and tolerance. They can be used for a quick inspection and can be specifically designed to minimize the influence of the operator. They can be equipped with indicators or probes to collect the measurement and aid in the statistical process control.
Any combination of the gaging varieties can be present on the same bench to suit different measurement requirements. It is also very common to see evolution in the quality control system of a manufacturer, requiring a shift from one gaging variety to another.
- Improving manual data collection drives many manufacturers to replace mechanical indicators with digital ones for an immediate measurement reading.
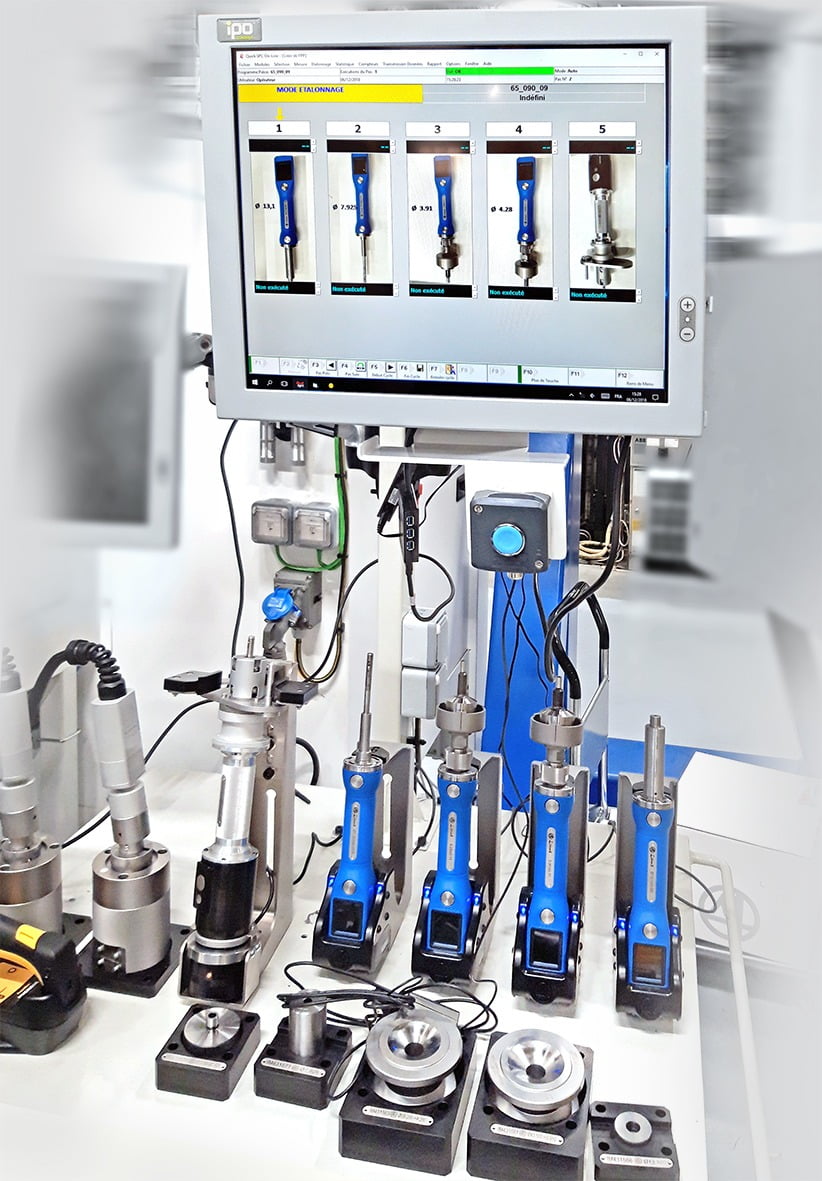
- The increasing need for automatic data collection pushes the development of reliable connections to gaging computers and the adoption of probes instead of digital indicators. When the process requires direct measurement while in the machine, the preferred option is the substitution of probes with advanced wireless variable gages, helping to alleviate cable entanglement.
Most metrological players are providing complete, straightforward, and ready-to-use solutions that also allow for data analysis. This may increase the complexity of the measurement process, making it more difficult to complete. To better manage the processes, and as a guide for the operator, industrial computers allow for integration with ERP systems and can prompt the operator through the measurement sequence. Additional training may be required for proper use of the gage, the industrial computers, software, and data collection.

Flexible, Automated Solutions
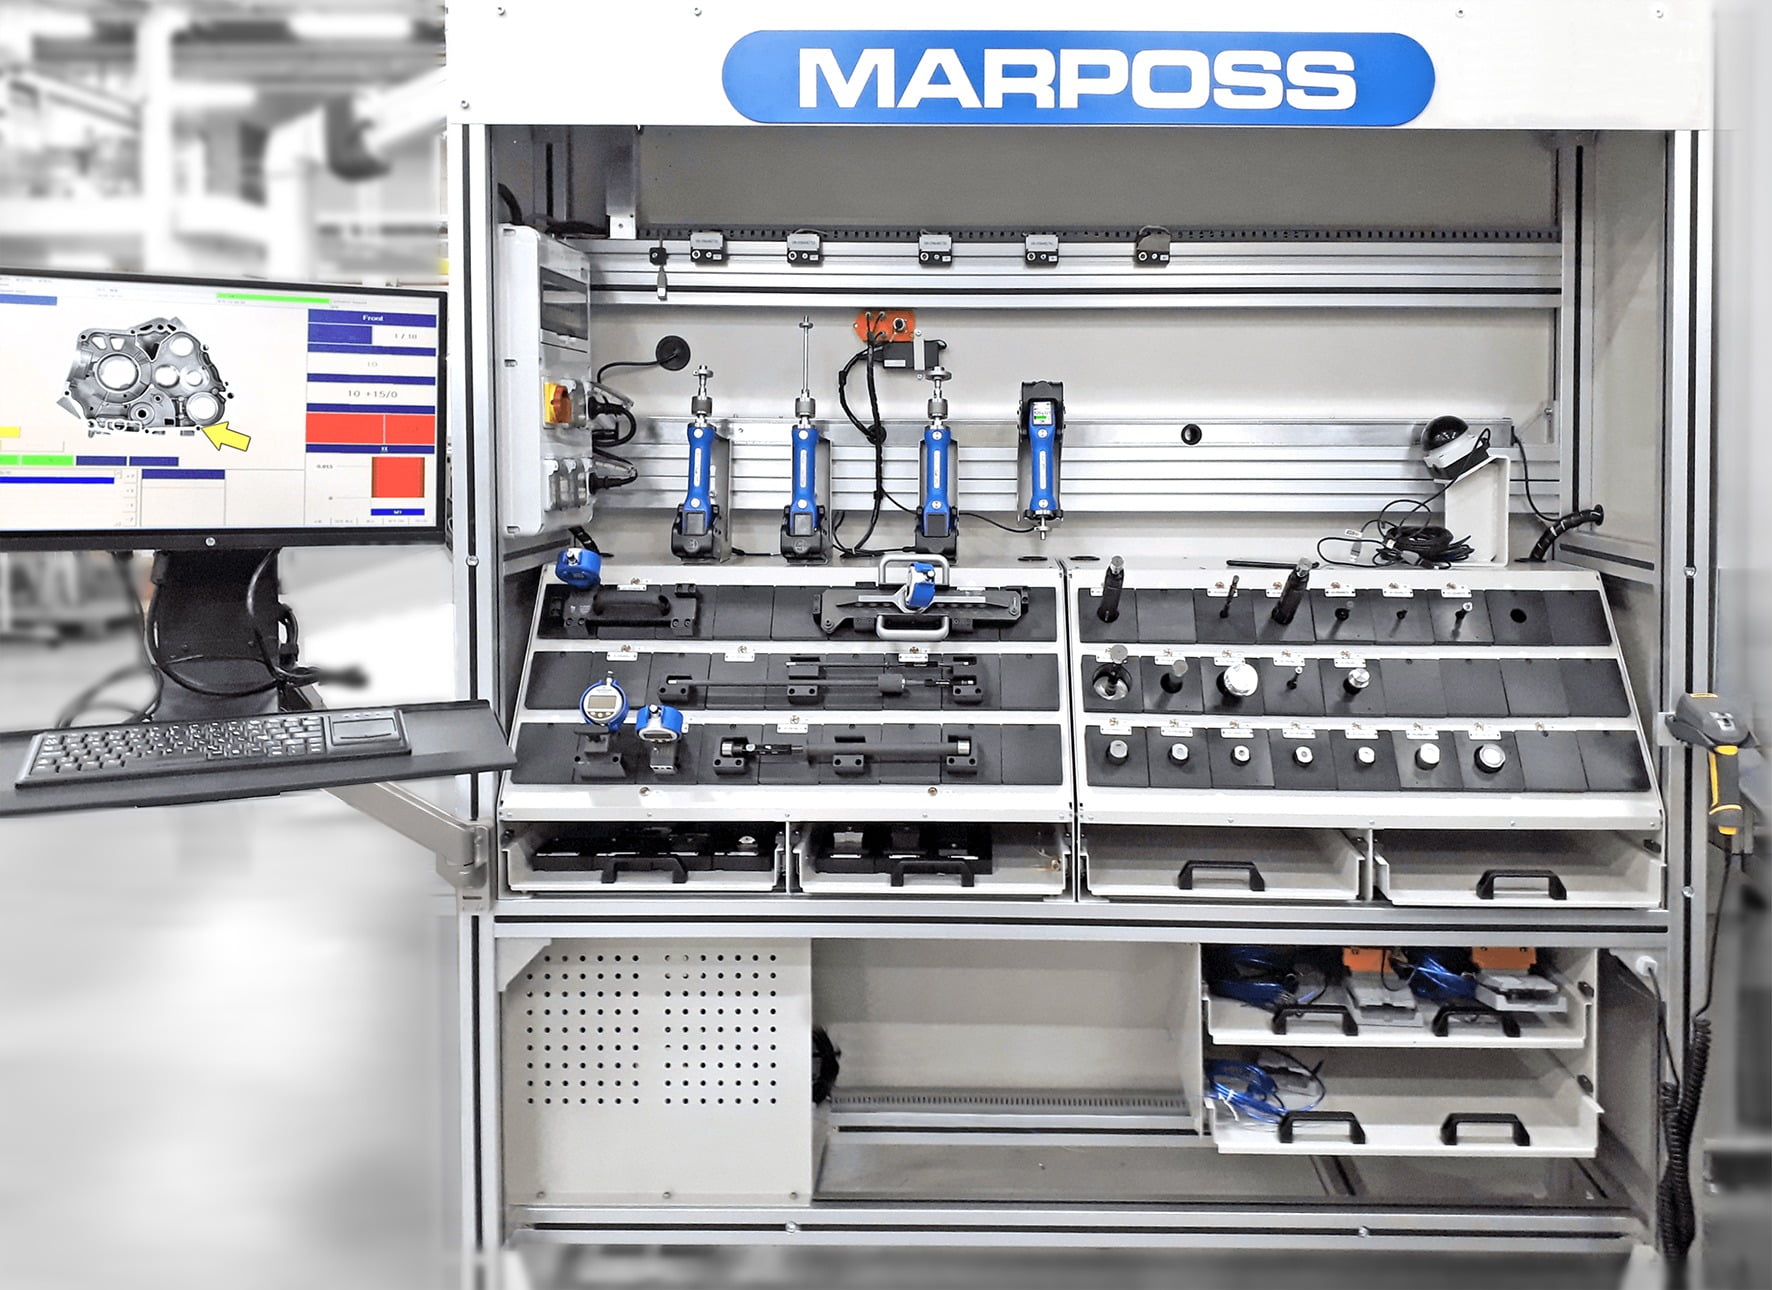
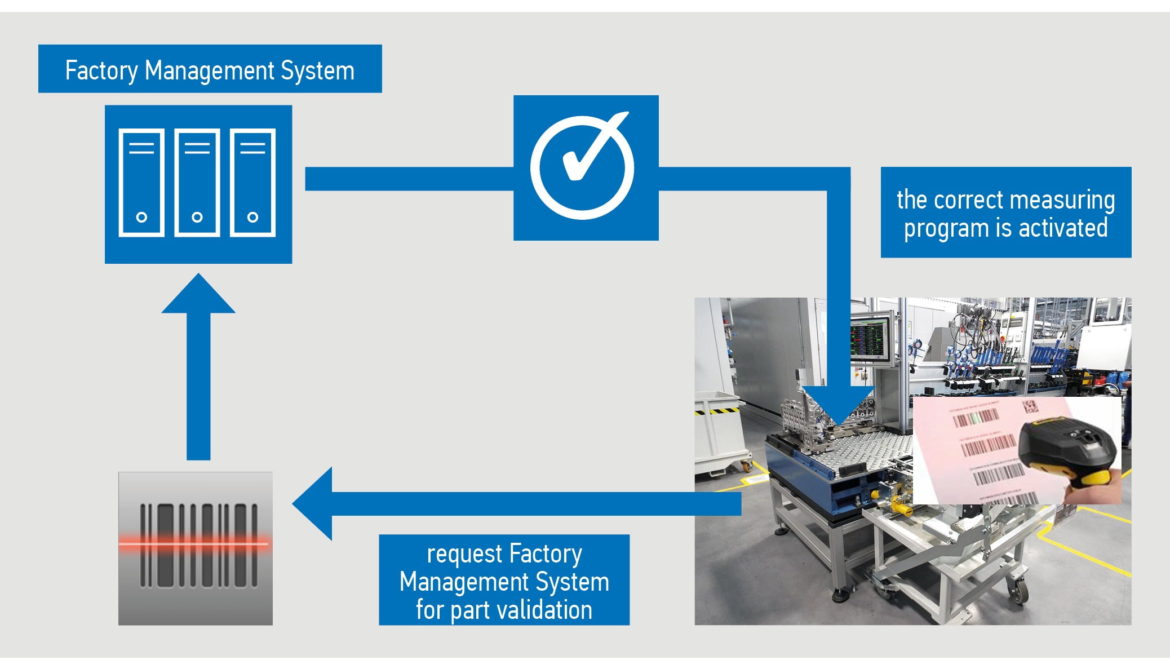
In this complex environment, solutions to control smaller batches have been developed. Flexible benches have become the preferred option when the inspection of several part types is needed. Everything has to be set at the programming level. The measurement process is generally connected to a remote monitoring and programming system. With the gage settings being set at the programming level, the quality control management can automatically manage the part measurement programs, based on which part type is loaded into the measurement station.
The first task is to recognize the part type and select the correct measurement program. Each part has a digital identity and benches can be equipped with an RFID or barcode reader to verify the part type. Once identified, the correct measurement program is automatically selected to match the part type being loaded into the measurement station.
Operators are guided step-by-step through the measurement operation (for example, which gage to use, which characteristic to check, etc.), with the data being automatically stored safely.
To help alleviate the potential of accidental human mistakes, manufacturers are moving away from the use of manual data management. Software integration is becoming an increasingly common tool used to ensure data availability and validation with a user-friendly feel for the operators. Available options include keyboard emulation, virtual interface box, CAQ software, and more.
Because quality personnel are increasingly requiring measurement records to be kept, even without any interaction with SPC software, variable gages are becoming the preferred methodology, with use of attribute gages decreasing. To collect measurements—without a gaging computer with SPC software functions—many handheld gage manufacturers are offering APPs (software with fewer available options) that may not require operator training. These APPs can help ease the transition to a more data-driven quality control process.
Human And Shop Floor Considerations
With more manufacturing facilities moving towards flexible automation and robotics, machines and gages are moving in the same direction, becoming easier to manage, so the need for operators to complete specific and complex actions is strongly reduced, and the training as well. Yet, to transition from a completely manual process to a more automated process, handheld gages must be redesigned to be more compatible (better interface) with robots or cobots (collaborative robots), requiring an “easy-to-grab” mechanical interface (for example, a flange) instead of an “easy-to-hold” handle (as would be used for human interface).
Performing measurements using electromechanical systems can help increase production capacity and reduce production costs. Programming can be done offline, which helps reduce downtime for the plant’s machines.
When the process requires direct measurement while in the machine, the use of advanced wireless variable gages can help alleviate any cable entanglement, following the principles of Industry 4.0. These advanced wireless variable gages can be specifically designed to perform in-line measurement while in use on the shop floor, close to the machines manufacturing the parts. To ensure that these gages are durable and strong enough to survive the harsh manufacturing environments, the appropriate materials, appropriate sealing, appropriate filtration of contaminants (for example, oil or grease) and appropriate resistance to dust and lubricants are taken into consideration.

Automotive Quality Leads The Way
This progression in process development is becoming increasingly important and adds a significant boost to the automotive manufacturing sector, especially with the anticipated transition from internal combustion engines to electric car systems, leading the market to search for new and innovative solutions.
Because the automotive sector is a widely accepted example for the entire industrial chain, all standards, regulations, and methods, that have been developed over time specifically for metrology are becoming the benchmark for other industry sectors (for example, aerospace, agriculture, prototyping, and automation
To accommodate this rapidly changing environment in the measurement process paradigm, handheld gage manufacturers must be committed to provide their products as “smart” enough to feed the Industry 4.0 demand, and sturdy enough to be used on the shop floor in a fully automated flexible measuring station.
All Other Images Source: Marposs
About the AUTHOR
Kyle Johns, Marposs, TESTAR division product manager.
For more information, call (248) 364-2594 or email salesusa@us.marposs.com.


