by Brookhaven National Laboratory
World-class synchrotron and free-electron laser research facilities, such as Brookhaven National Laboratory’s National Synchrotron Light Source II (NSLS-II), are expected to yield some very exciting science. To do this, they need the most advanced measurement tools and components.
One type of device used at these facilities is the x-ray mirror, which manipulates beams of x-rays via reflection or interference. These mirrors, which can be up to 1.5 meters long and are either planar, spherical, toroidal, or elliptical, are highly polished and ultra-smooth. They have evolved significantly over the past 15 years, but further enhancements have been hindered due to a technical issue: measurement.
So said the prolific mathematician and physicist Lord Kelvin, “If you cannot measure it, you cannot improve it.”
To make even better x-ray mirrors – which are already smooth down to the billionth-of-a-meter (nanometer) level – there must be tools available that can take even smaller measurements. Therefore, there must be more research and development into ways to provide these tools.
Researchers from Brookhaven Lab and Imagine Optic, an optics technologies firm based in France, have addressed this issue. They found a way to perform automated, high-accuracy optical measurements for the testing of advanced x-ray mirrors for use at NSLS-II and other facilities. They developed their method at the NSLS-II Optical Metrology Laboratory, which ensures that all optical components installed at NSLS-II beamlines will be up to par.
One of the ways to gauge the quality of an x-ray mirror is to determine its “slope error,” which is a measure of the surface’s natural bumpiness. Mirrors have two-dimensional surfaces, yet current slope-measuring tools can only measure the slope error along one dimension.
The researchers’ solution is a piece of equipment called a Stitching Shack Hartmann Optical Head (SSH-OH). The heart of the device is the Shack Hartmann sensor, a device that measures the wavefront of an x-ray beam – the “shape” of the waves (Earth’s spherical sun, for example, emits light with a spherical wavefront). The sensor consists of an array of mini-lenses that break up the beam into “beamlets,” which are focused onto a digital camera. Analyzing all of the beamlets allows scientists to reconstruct the local wavefront. The full mirror picture – a slope- or height-error two-dimensional map – is built by “stitching” together the local wavefront. This slope surface is typically measured in nanoradians, or billionths of a radian, which is the standard unit of angular measure in the synchrotron community.
The idea to use a Shack Hartmann sensor to characterize x-ray mirrors was previously proposed by researchers at Imagine Optic and the SOLEIL synchrotron in France. In this work, described in the February 10, 2014, edition of Optics Express, the Brookhaven Lab-Imagine group has made three key “upgrades” to the premise: First is a much improved sensor, with features that include very high precision; second is the positioning system, with the SSH-OH mounted on a very precise stage; third is the metrology software, which is robust and full-featured.
“Our approach is innovative because it combines these three main elements into a stand-alone, non-contact, large-surface optical metrology system,” said the paper’s corresponding author, Mourad Idir, a scientist in Brookhaven Lab’s Photon Sciences Directorate (before coming to Brookhaven, he worked at SOLEIL/France and was part of the group that came up with the idea).
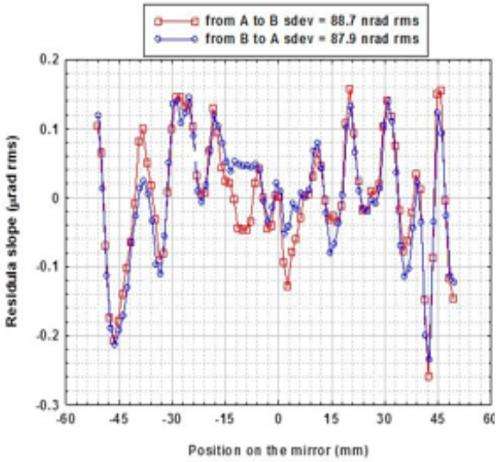
Idir and his colleagues used the SSH-OH to characterize mirrors with flat, spherical, and elliptical shapes. Their test of a spherical mirror consisting of 10 scans repeatedly returned a slope error dispersion of 50 nanoradians (nrad) between all the scans. This test also demonstrated the importance of measuring slope error in two dimensions rather than a single line across the mirror: The two-dimensional slope-error map shows quite different results along several ‘x’ directions.
To show that the SSH-OH can assess very large optical components, the Optical Metrology group tested it on a 1.4-meter bendable silicon mirror developed for the NSLS-II X-Ray Powder Diffraction beamline, measuring the slope errors for zero curvature (flat) and several bend conditions.
“The SSH-OH can rapidly and robustly measure the profile of an x-ray mirror in a way that is simple, fast (production compatible) and also has the benefit of requiring no contact with the mirror,” said Idir. “We expect that future calibrations and development will further improve its performances.”


