A specific standard to characterise the performance of measuring arms
From February 2020 onwards, Kreon ACE measuring arms will be certified in accordance with the 10360-12 standard. This international certification requires common tests to be performed by all players in the sector to ensure greater transparency of product specifications for buyers.
The standard applies to measuring arms fitted with a probe, whereas tests for arms with a 3D scanner are based on the 10360-8 standard. The 10360-12 tests result in new designations for the technical documentation of measuring arms, such as LDia, PForm, PSize and EUni (as described in detail below). 6- and 7-axis measuring arms are specified using the same tests.
TESTS FOR SPECIFYING MEASURING ARMS
Test 1, two results:
Size error on a sphere, tactile
PSize (PSize.Sph.1×25::Tact.AArm)
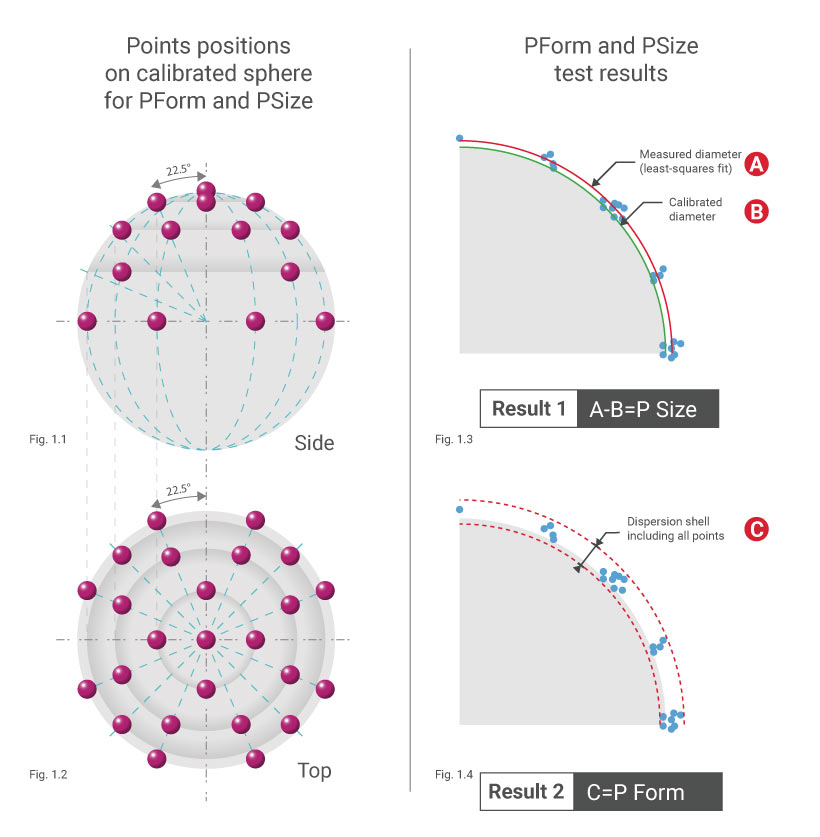
The PSize value expresses the error when measuring the size of a geometry, specifically the diameter of a sphere. It is calculated as the difference between the diameter of a least squares sphere, deduced from 25 points measured, and the calibrated diameter of the sphere (Figure 1.3).
Form error on a sphere, tactile
PForm (PForm.Sph.1×25::Tact.AArm)
This test, based on the preceding one, establishes the distribution of contact (tactile) measurements over a sphere. 25 points are probed on a calibrated sphere, and a least squares sphere is derived from these 25 points. The test result is the thickness of a shell encompassing the 25 points, the center of which is the least squares sphere (Figure 1.4). This process has to be repeated for two positions of the sphere within the volume of the measuring arm. The worse of the two results is used.
Test 2: Articulated location error, tactile
LDia(LDia .5×5 :Art :Tact.AArm)
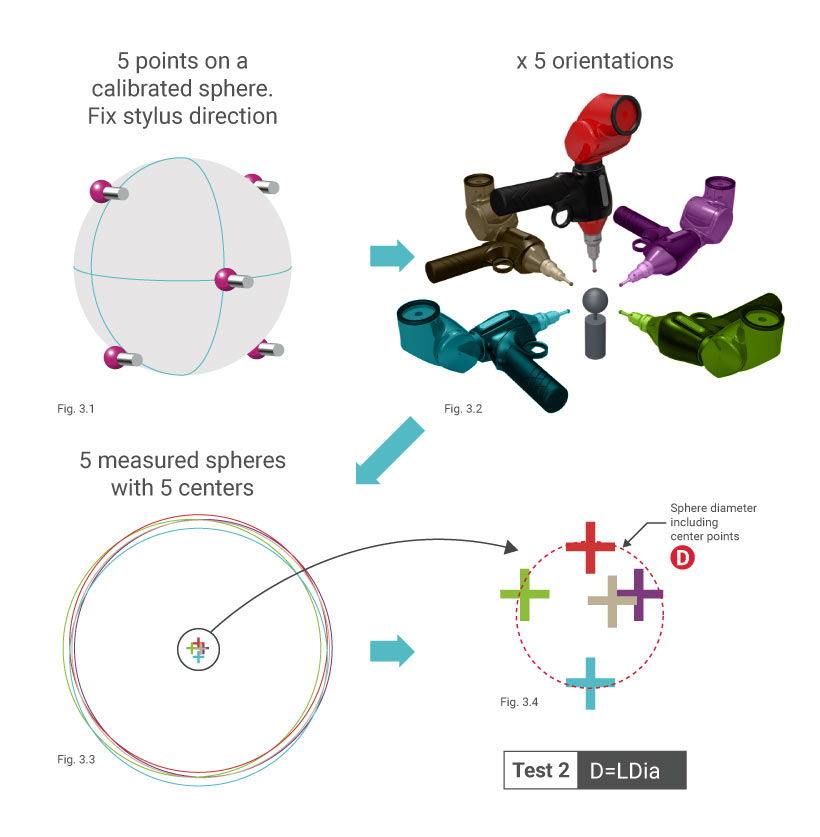
This test determines the errors caused by the articulations of the arm, primarily axes 5, 6 and 7 of the joint. 5 points are probed on the sphere with the probe pointing in the same direction (Figure 3.1), and this process is repeated in 5 different orientations (Figure 3.2). The center of optimum adjustment of the sphere is calculated for each set of 5 points. The diameter of the smallest sphere encompassing the five centers calculated is the result of the test. The process has to be repeated for two positions of the sphere within the volume of the measuring arm.
Test 3: Length measurement error, unidirectonal, tactile
EUni (EUni :0 :Tact.AArm)
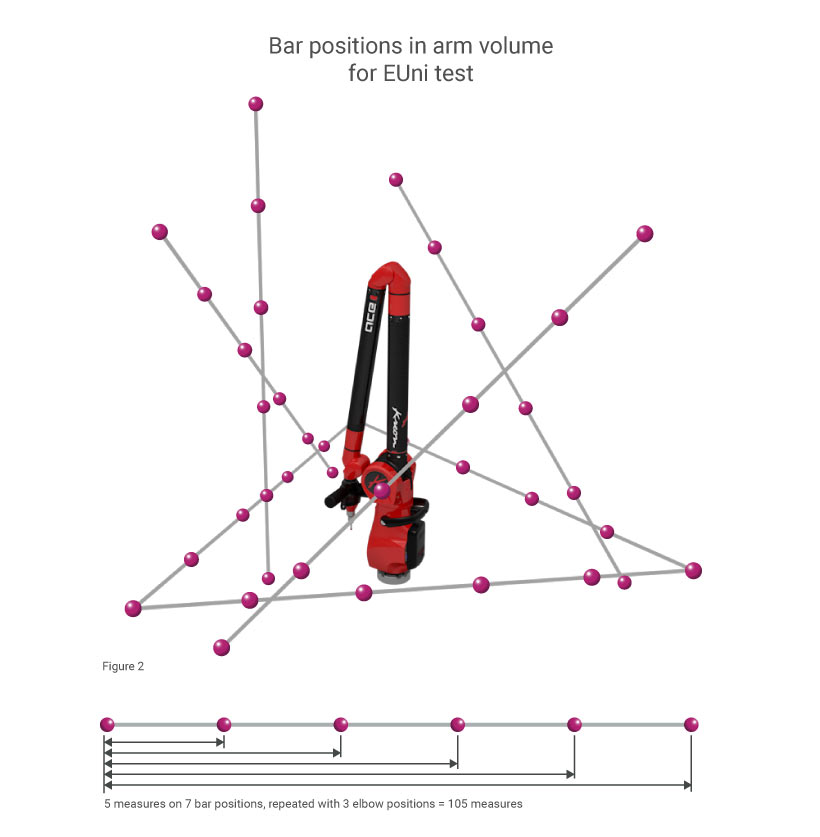
The EUni test establishes the unidirectional length error between two probed points. It is based on 105 length measurements, each obtained by probing two spheres. This test is carried out over the entire volume of the measuring arm (Figure 2), taking the motion of the arm’s elbow into account. The test result is not an average but corresponds to the greatest error out of the 105 measurements. The closer the result is to 0, the greater the accuracy of the arm within its volume.
Test 4: SPAT
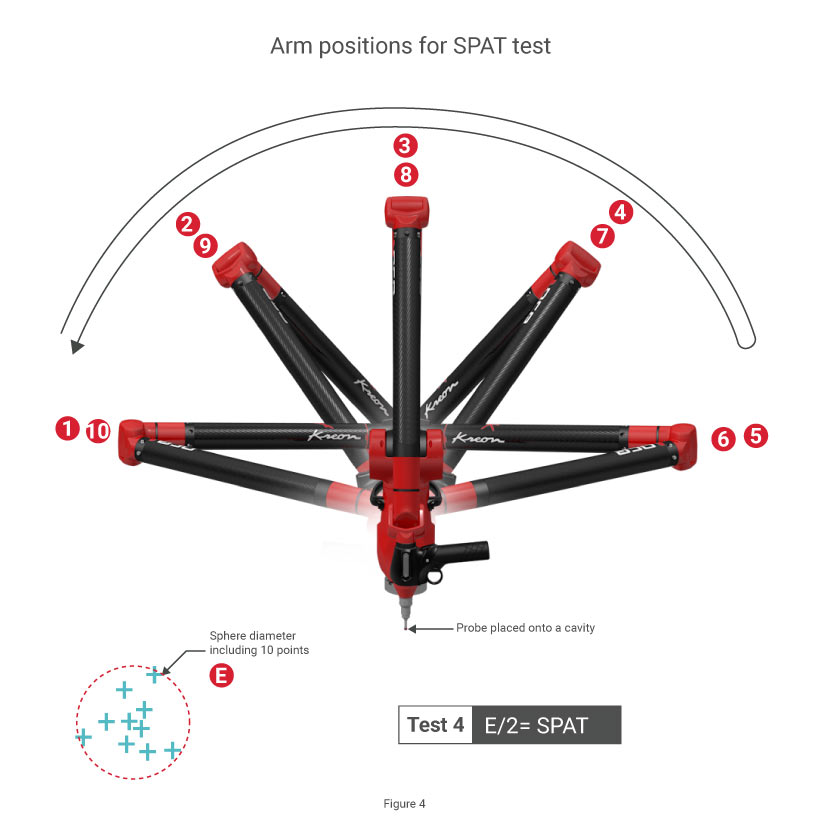
This complementary test, found in the annex to the standard, can be used to rapidly check the performance of a measuring arm. It determines measuring accuracy with the probe immobile and the elbow moving from left to right (Figure 4). The probe is positioned in a cavity, and 10 points are measured at the same position while the elbow moves back and forth. For a 7-axis arm, the joint has to be swivelled around by 180° before returning it to its original position. The result is the radius of the smallest sphere encompassing the 10 points measured.
TESTS FOR SPECIFYING A MEASURING ARM USED WITH A SCANNER
Tests based on the 10360-08 standard
The 10360-08 standard describes validation tests for laser scanners on a fixed 3D measuring apparatus. Here they have been adapted for portable measuring arms in order to determine the global measurement uncertainties for the arm and scanner.
Test 5: Form and Size error, scanning
PForm and PSize, scanning
With regard to measuring arms with scanners, the PForm and PSize tests are identical to those of the 10360-08 standard, but the scanner base and measuring arm replace the CMM. An article on the full range of specification tests for Kreon scanners based on the 10360-08 standard can be found here.
Test 6: Articulated location error, scanning
LDia (LDia.5×25 :Art :ODS)
This test assesses the repeatability of contactless measurements performed by a scanner. More specifically, it determines the error which can occur when changing scanner orientation in space. A calibrated sphere is measured in 5 different orientations (as for EUni using a probe), and the centers of the 5 spheres resulting from each orientation are deduced. The diameter of the smallest sphere encompassing the 5 centers obtained is the result of the test. This test is not used for characterising the scanner itself but rather to determine the influence of movements of the arm’s articulations on measurements.
Test 7: Length measurement error, unidirectonal, scanning
EUni, Scanning (E[Uni:j:ODS])
This test is similar to EUni except that it evaluates the unidirectional length measurement performance of a measuring arm with a scanner and not with a probe. The result is the greatest measurement error out of 105 measurements taken within the volume of the arm.

Kreon provides a test certificate based on the 10360-12 standard with each measuring arm, thus ensuring a high level of quality assurance. In addition, we recommend signing a maintenance agreement for yearly recalibration of your measuring arm. Kreon distributers around the globe are fully qualified and authorised to recalibrate Kreon measuring arms.


