A standard for easy comparison of 3D scanners intended for metrology
It is essential to have complete confidence in a measuring instrument when handling quality processes in an industrial environment. A scanner with good specifications and clearly defined limits can be put to better use and will provide consistent results for the application concerned. By standardizing tests for all manufacturers, ISO 10360-8 ensures consistency, clarity, and hence confidence in scanner specifications.
Are we seeing the end of questionable specifications?
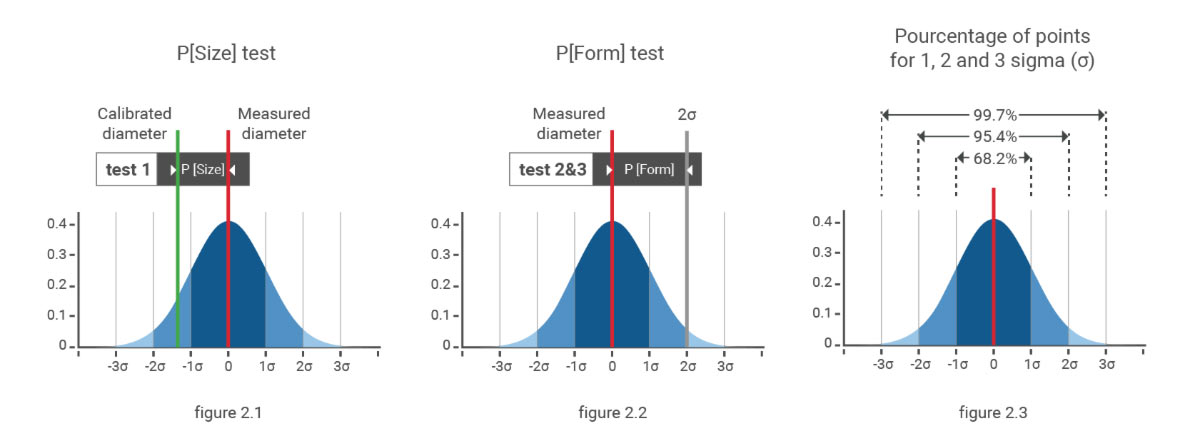
In the past each manufacturer used tests that showed their respective products to the best advantage. The most striking example is the specification of form deviation in scanner measurements. Let’s compare two scanners which have a form error of 15 µm and 18 µm, respectively. At first glance, the first scanner seems better, except that its form error is expressed at 1 sigma (σ) and that of the second at 2 σ. That means that the first result takes 68% of the most accurate points into consideration, and not 95%, as does the second (see Figure 2.3). In fact, it is highly likely that the second scanner will perform better. While a shrewd observer may be able to spot the stratagem, special tests created by manufacturers can make comparisons between products well-nigh impossible.
Which 3D scanning technologies are covered by ISO 10360-8?
The standard addresses a wide range of technologies, so the performance of very different systems can be compared. Typical measurement principles concerned are triangulation and coaxial distance measurement. The former includes structured line projection, Moiré, slit light projection, point scanning, etc., and the latter includes interferometry and confocal systems.
THREE MAIN TESTS PERFORMED BY KREON
How to perform the tests?
Since Kreon scanners use the laser triangulation principle, testing according to ISO 10360-8 requires them to be moved in a linear manner using a CMM. Numerous tests are defined, which in many cases provide a good assessment of both the CMM and scanner performance specifications. The tests for scanners determine the following faults: noise, digitisation error, image distortion, optical interaction with the sample surface, standardisation error, incorrect algorithm. The following analysis is based on three essential tests used by Kreon.

Test 1: Maximum permissible error of probing size error All
MPE (P[Size.Sph.All:Tr:ODS])
This test determines the scanning error when measuring a dimension.
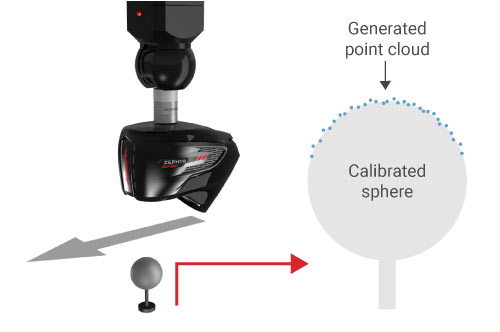
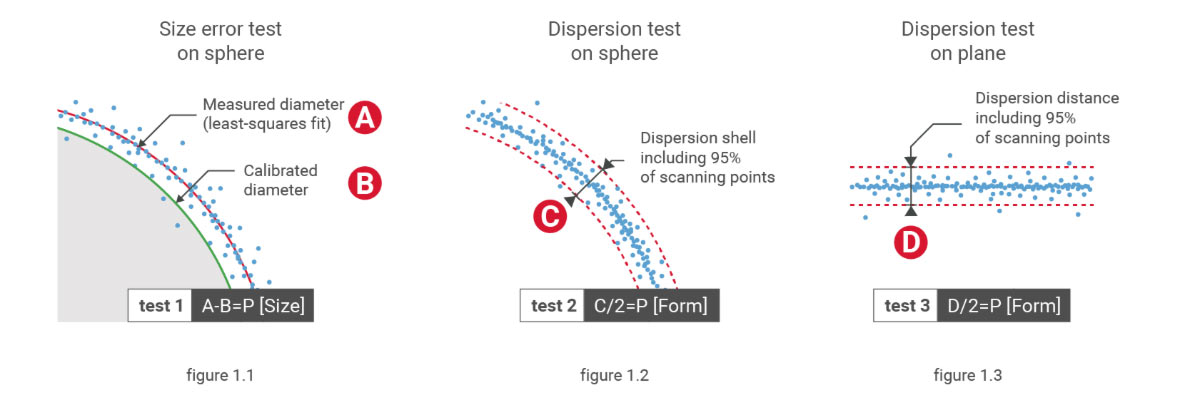
Carried out on a reference sphere, it gives the difference between the diameter measured by the scanner (deduced by the least squares method from all points scanned) and the actual diameter of the sphere scanned. The closer the result is to 0, the more accurate the scanner when measuring the size of geometric shapes.
How we proceed (1.1 and 2.1 figures)
- Scan the calibrated sphere.
- With all the points generated, calculate the Measured diameter with the least square fit method.
- Make the following difference: Measured diameter – Calibrated diameter = Test result.
Test 2: Maximum permissible limit of probing dispersion on a sphere
MPL (P[Form.Sph.D95%:Tr:ODS])
This test determines the distribution of points on a scanned surface (Fig. 1.2).
It can be used to assess measurement noise. Carried out on a calibrated sphere, it draws an envelope round the sphere (like a shell) covering 95% of scanned points (2 σ). For the test result, the thickness of the shell is divided by two as it is expressed at +/-2 σ. The closer the value to zero, the less noisy the point cloud.
How we proceed (1.2 and 2.2 figures)
- Scan the calibrated sphere.
- Calculate the width of a spherical shell including 95% of the generated points.
- 1/2 Thickness = Test result.
Test 3: Maximum permissible limit of probing dispersion on a plane
MPL (P[Form.Pla.D95%:Tr:ODS])
This test complements the preceding one while applying the same principles. Here the laser line is tested in its entirety and not partially as on the sphere.
Measuring noise is determined based on a plane rather than a sphere. The test covers 95% of scanned points between two parallel planes. For the test result, the distance between these two planes is divided by two as it is expressed at +/-2 σ. The closer the value to zero, the less noisy the point cloud.
How we proceed (1.3 and 2.2 figures)
- Scan of the plane.
- Calculate the minimum distance between two planes including 95% of the generated points.
- 1/2 Distance = Test result.


Expression of tests on a Gaussian curve representing the population of points around their mean value.
Notation system for test description
P or E ?
– P = Performance.
P refers to a performance parameter of the scanner such as, for example, the distribution value of the point cloud.
– E = Error.
E refers to a measurement error, such as, for example, an error in the size of a sphere.
MPL or MPE ?
A maximum permissible limit (MPL) as opposed to a maximum permissible error (MPE) specification is used when the test measurements are not errors; hence, testing an MPL specification does not require the use of artefacts with a relevant calibration.
The MPL and MPE values, as specified by the manufacturer, guarantee that the relevant system performs better than the maximum values allowed.

DO ALL TESTS DEFINED IN THE STANDARD HAVE TO BE PERFORMED?
Why not do the LDia test?
The LDia test determines the performance of CMMs equipped with an articulated arm. It measures a sphere using a scanner positioned in 5 different orientations. Combining CMM errors and those of the rotating head (PH10 for example), it is among the tests that focus on faults of articulated systems, rather than those of scanners. That is why at Kreon, we do not include this result in our scanner specifications.
However, when configuring a CMM with a scanner, this test can be useful to verify the uncertainties related to a multiple indexing head in particular.
Why not test length measurements?
Length measurement tests involve significant movement of the CMM, placing them in the category of tests to be performed when testing the CMM and not specifically the scanner.
Are some tests irrelevant?
Numerous tests are based on a very significant reduction of cloud points, retaining as little as 25 points. Out of several methods available to choose these points, the simplest consists in selecting a single point in each of 25 zones distributed uniformly. That makes it easy to take the 25 best points, ensuring excellent results which by no means reflect the performance of the scanner in normal use.Particularly suited for scanners on a CMM, the ISO 10360-8 standard yields reliable specifications for a wide range of scanners using different technologies. Its increasing adoption is a great help in making the performance data of commercially available scanners more comprehensible. Buyers, metrologists and engineers can now begin to get the real picture on this ever expanding product offering. Supporting this drive for transparency and clarity, Kreon has been committed to basing all its new scanner specifications on ISO 10360-8 ever since 2016.


