Energy losses due to friction and wear of sliding surfaces and other tribological contacts account for 23 % of the world’s energy consumption. This figure justifies the need for technologies capable of mitigating friction and wear. Accurate laser surface texturing of micro-metric sized features on sliding surfaces have shown a significant decrease of friction coefficients while improving the part’s service life due to increased wear resistance. However, there are some constraints that may act as a barrier for this technology to be implemented in the industry. These are partly related to the cost of the equipment since the required quality of the surface features usually implies the use of expensive ultra-short pulsed laser sources. In addition, laser surface texturing speed may result in excessively long processing times.
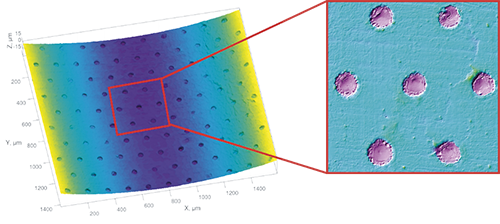
In this study, they demonstrate a novel laser surface texturing method based on a cost-effective sub-nanosecond (ns) near-infrared (NIR) fiber laser source. This laser-based method shows friction reduction and increased wear resistance, which in turn results in greater component efficiency and longer service life (e.g., pistons). The surface pattern consists of arrays of micrometric-sized dimples and slots, with controlled depths and widths in the range of a few tens of micrometers (Figure 1).
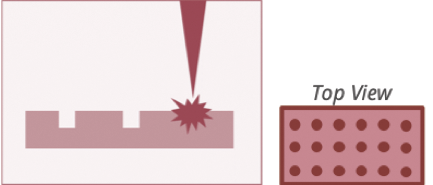
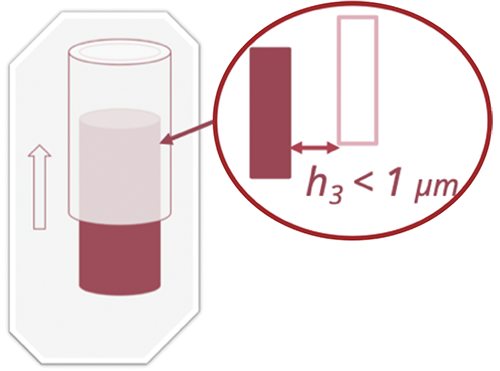
The laser surface texturing process melts the material, which may accumulate as an edge rim around the dimples (Figure 1). The height of this molten layer rim (h1), whenever present, is critical towards the final application as there might be a very tight manufacturing tolerance of less than 1-micrometer maximum allowed height between sliding surfaces. In addition, the depth of the dimples (h2) is also relevant: in most cases, it is necessary to measure topographies (heights) with an accuracy better than 1 micrometer (Figure 2).

In the past, Scanning Electron Microscopy and Optical Microscopy were used to inspect the surface height profile in laser micromachined surfaces. Nowadays, optical metrology techniques such as Confocal, Interferometry, and Focus Variation enable the evaluation and study of new laser micromachining routines with much greater speed and sufficient resolution.
However, given the wide variety of materials and types of surfaces (polished vs unpolished, smooth vs rough, high reflectivity vs low reflectivity materials, among others), each optical technique is only suitable under certain situations. This is one of the main reasons why the 3D optical profilometer S lynx was chosen to carry out this work. This feature allows for quickly evaluating all kinds of surfaces.
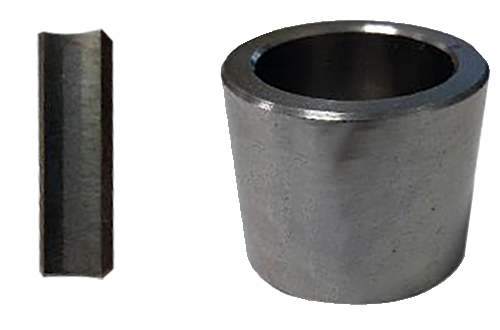
The samples used in this study consisted of grey cast iron cylinders (Figure 4), which are widely employed in internal combustion engines, cylinder blocks, pumps, and compressors, among others. The cylinders were preconditioned by a honing process and cut into sample segments of 30º each to allow for inspection. After studying the optimum acquisition settings in each technique, the Confocal technique with a magnification of 50X was found to be the most suitable for this study.
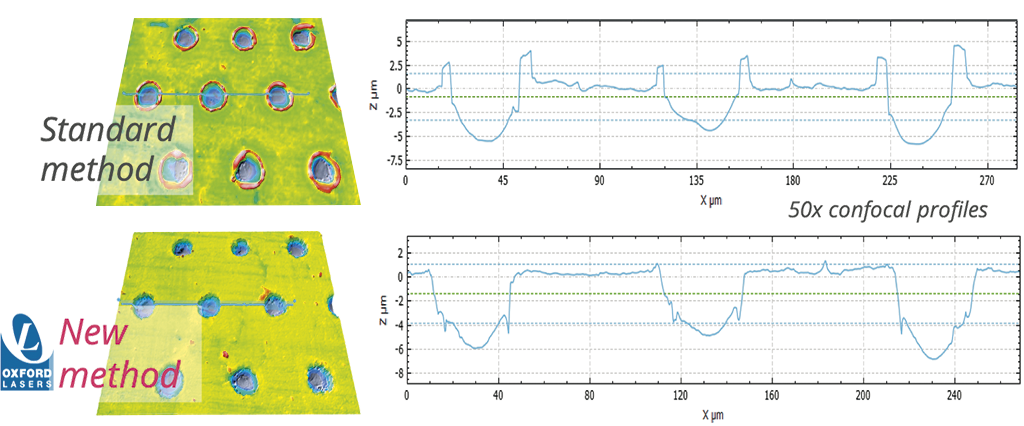
The novel laser texturing process is compared with a standard method in Figure 6. As can be seen, the new method shows a reduction in heights of re-deposited material below 1 µm whereas in the Standard method this value is two times larger. Further analyses also suggest a reduction in the coefficient of friction of about 25%.
The 3D optical profilometer S lynx has been shown to be an accurate, fast, and easy-to-use tool to investigate a novel laser surface texturing method. The 3D optical profilometry allowed qualitative and quantitative analysis, in particular, Confocal technology has proven to be an effective technique to investigate and characterize the depth and diameter of the dimples and more importantly, the height of the re-deposited material around the dimples during the laser process development.
The new method provides an optimum surface with practically zero-heights and no re-deposited material after laser process optimization, including a reduction on the coefficient of friction (COF) of about 25%. Further studies may consider the use of an automatic detection and analysis software where all the previous parameters of interest can be extracted automatically (i.e., plug-in Hole, SensoPRO software, Sensofar).
Oxford Lasers as one of the most successful spin outs from Oxford University, Oxford Lasers have been at the forefront of laser technology for over 40 years. They design, develop and manufacture the full spectrum of Laser Micro-Machining Tools & Laser High Speed Imaging Systems. The authors of this study are Daniel Arnaldo, Etienne Pelletier and Dimitris Karnakis. The authors would like to acknowledge the partial financial support from Innovate UK under grant Nº102713.
To know more, please check Sensofar.


