This content was originally written and published by the Vision Engineering team on their website. Reproduced here from this link.
It goes without saying that Aerospace components must be manufactured to the strictest tolerances and quality regimes. When a company holds over 10,000 different component types, it needs flexible measuring and inspection equipment to ensure product quality.

Specialist Technologies Aerospace Group (STAG) provide a spares and stock management service to the international Aerospace market. By maintaining a large inventory of critical and standard spare components, STAG is able to offer customers a fast and reliable spares function, removing the need for the aircraft operator or manufacturer to keep their own stock of replacement components. In order to ensure that these components are within tolerance and to specification, STAG has invested in a Hawk non-contact measuring system, from Vision Engineering.
Efficiency and accuracy improved
Aerospace component measurement and inspection can be a challenging application due to the nature of the subject. Components tend to be complex and highly reflective, with curved and flat surfaces presenting reflections and glints.
Vision Engineering systems all use a true, optical head which presents clear, sharp image without glare. This means an operator will be able to see edges and features much more clearly, which will improve their operating efficiency and accuracy.
Vision Engineering’s patented Expanded-Pupil optical technology offers users an unrivalled level of head freedom and a comfortable body posture. There are two key benefits to this unique optical technology.
Key benefits to unique optical measurement technology

The operator is able to work for long periods of time at the gauging station without needing to adopt an unnatural body posture – vital when accurate, repeatable measurements are necessary. A further benefit is the clarity of the image.
Conventional video technology is limited by the resolution of the camera, its sensitivity to light variations and a reduced level of colour fidelity. While this may not be an issue when viewing very simple components, such as a washer, it becomes important if the component has very little contrast (for example measuring black webs on a black plastic moulding) or if the component is highly reflective (for example a turned, polished shaft).
Ensuring stocked components are in specification
Reputation and reliability are critical when setting up spares and stock management partnerships with Aerospace OEM’s and Tier 1 suppliers.
The customer must be confident that the components delivered are to the correct specification and within tolerance. The Hawk system provides STAG with a metrology and inspection capability that allows them to assure and demonstrate to customers that the components they stock and deliver are in specification.
With more than 10,000 live component lines, the metrology and inspection system must be extremely flexible and user friendly to cover the wide range of spare components that are held in stock.
True optical image of the components
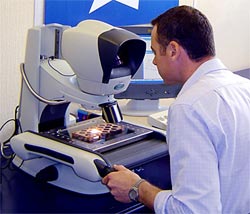
Hawk is a 3-axis non-contact measuring system developed by Vision Engineering. Hawk uses advanced optics and a highly accurate measuring stage to gauge components; it is effectively a co-ordinate measuring machine (CMM) that gauges a true optical image of the component rather than using touch probes. By moving the measuring stage below the viewing head, a 3D feature map of the object can be generated, allowing the operator to determine if the component is within tolerance.
The Hawk is connected to a PC running QC5000 metrology software, which offers a large number of feature construction and data logging tools.
STAG use the Hawk metrology system in their goods in area, where new stock components are received and inspected before entering the computerised storage area. By carrying out sample inspection on the received goods, STAG ensures that components entering the inventory system will meet the specifications of their customers.
In addition to checking the physical dimensions of these components, the optical view provided by the Hawk system allows the quality inspector to clearly view the surface and finish of the inspected part, a useful feature that can identify manufacturing problems even when the component is inside tolerance bands.
A digital camera can be attached to capture the image seen by the operator, allowing any issues to be rapidly addressed with the component manufacturer and the end customer. The image can be emailed immediately to all concerned parties, considerably reducing time delays caused by raising concession notes.
95% of stock now able to be measured
The range of components that pass across the Hawk’s measuring stage is huge, with STAG aiming to stock aircraft general spares and new build / refurbishment kits for most of the major European aerospace manufacturers. 95% of these components can be measured using the Hawk, which in its standard configuration has a 200mm (X) x 150mm (Y) x 200mm (Z) measuring envelope.
All of the volume components (nuts, bolts, washers, screws) are easily accommodated within this envelope, providing a versatile solution for quick change over gauging. STAG’s Quality Manager, Ken Delderfield has been working with Hawk since it was first delivered.
“Hawk is the ideal piece of metrology equipment for us. It is easy to use and flexible enough to gauge nearly all of our components. The reporting capability allows me to capture a data file for every component we measure, which is vital for component traceability.”
STAG have now been operating the Hawk 3-axis non-contact measuring system for over six months, the capabilities of which have not gone unnoticed by some of their key customers.
Mike Ireland, Senior Business Development Manager for STAG commented:
“The Hawk system has quickly proved valuable to our business. Not only are we able to gauge virtually all of the components that we stock, but visiting customers can simply carry out a gauging routine on their components – ensuring their confidence in us as a supplier. In this industry, nothing is more important than reputation.”


