This article has been written by Kanyanta Mubanga and has been reproduced here.

Tech reporter
SUMMARY
Photogrammetry is the process of taking reliable measurements from photographs. It has been with us in some form for centuries, and has helped shape our understanding of things like the earth’s surface. Today, it plays a vital role in many industries. So here is a primer to give you a general understanding of what it is, and how it works.
WHY PHOTOGRAMMETRY? — The widespread availability of cameras has made it possible for more people to create 3D models, whether for engineering purposes or CGI, relatively easily.
HOW TO CAPTURE DATA FOR IT? — By using a camera in a scene prepared for CGI photogrammetry, or a camera with a photogrammetry kit designed for measurement-related applications.
WHO USES PHOTOGRAMMETRY? — Engineers on construction projects, archaeologists in heritage preservation, CGI experts in the film and gaming industries, mapping experts, land surveyors, to name just a few.
Introduction
Photogrammetry is a wide-ranging subject. It has grown more and more popular over the years and so it is used in many different applications, each with its own peculiarities. Here, we introduce the general concepts that underpin photogrammetry. We go into how it works, some common applications, what hardware is typically used, when generally to use photogrammetry – and when not to.
Let’s start with a definition.
Defining photogrammetry
Photogrammetry is the process of taking reliable measurements from photographs. This definition might seem a bit simplistic, but the etymology of the term bears this out: “Photos” is Greek for light, “gramma” means writing or drawing, and “metron” to measure.
You might also come across some definitions of photogrammetry that include taking measurements from patterns of electromagnetic radiant energy and other phenomena. This is because in some circles, the definition of photogrammetry includes not just photography, but also data from other multi-spectral imagery.
KEY POINT
Photogrammetry is a means of getting reliable measurements from photographs.
At the end of the day, the general principle behind it remains unchanged: Getting reliable information about physical object dimensions by examining and interpreting images. In the majority of cases, these images are regular pictures from a camera – usually a DSLR. This is the definition we will work with.
So, think of an old-school image of a crime scene with a ruler for scale placed next to an object of interest and photographed. Does that qualify as photogrammetry? It does, after all, provide a means of measuring an object from a photograph.
Well, not exactly. We’ll see why in a moment.
How does photogrammetry work?
We define photogrammetry as taking reliable measurements from photographs. The word “reliable” here is doing a lot of heavy lifting because, in essence, reliability is what photogrammetry is all about.
Going back to the crime scene, let’s say we have a picture of a footprint on the ground with a forensic ruler next to it. We cannot confidently determine the shoe size from the picture even with the ruler providing scale. If the footprint curves over a mound of earth, from above, it appears smaller than it actually is.

If this footprint was made over a curved mound of earth, it might appear smaller from this perspective, making measurements from this picture unreliable.
To take an accurate measurement, we must account for the curvature of the surface. But if the camera is positioned directly over the footprint looking downwards, it is blind to the contours of the ground.
So how does photogrammetry circumvent this problem?
The short answer is by using multiple overlapping pictures from different positions and angles.

Photogrammetry infers dimensions from a scene by using multiple overlapping pictures taken from different positions and angles.
It’s all about perspective
Photogrammetry is centered around perspective and its interpretation. What photogrammetry essentially does is go backwards in the photography process. While photography takes an object or scene and flattens it into a 2D image, photogrammetry does the reverse; it looks at this 2D representation and constructs a 3D model from clues in the images.
But how exactly?
We know that cameras see objects in a similar manner to the human eye. For instance, the nearer an object is to the lens, the larger it appears. An illustration of this is how a straight road appears to taper off into the distance even though its width does not actually change.
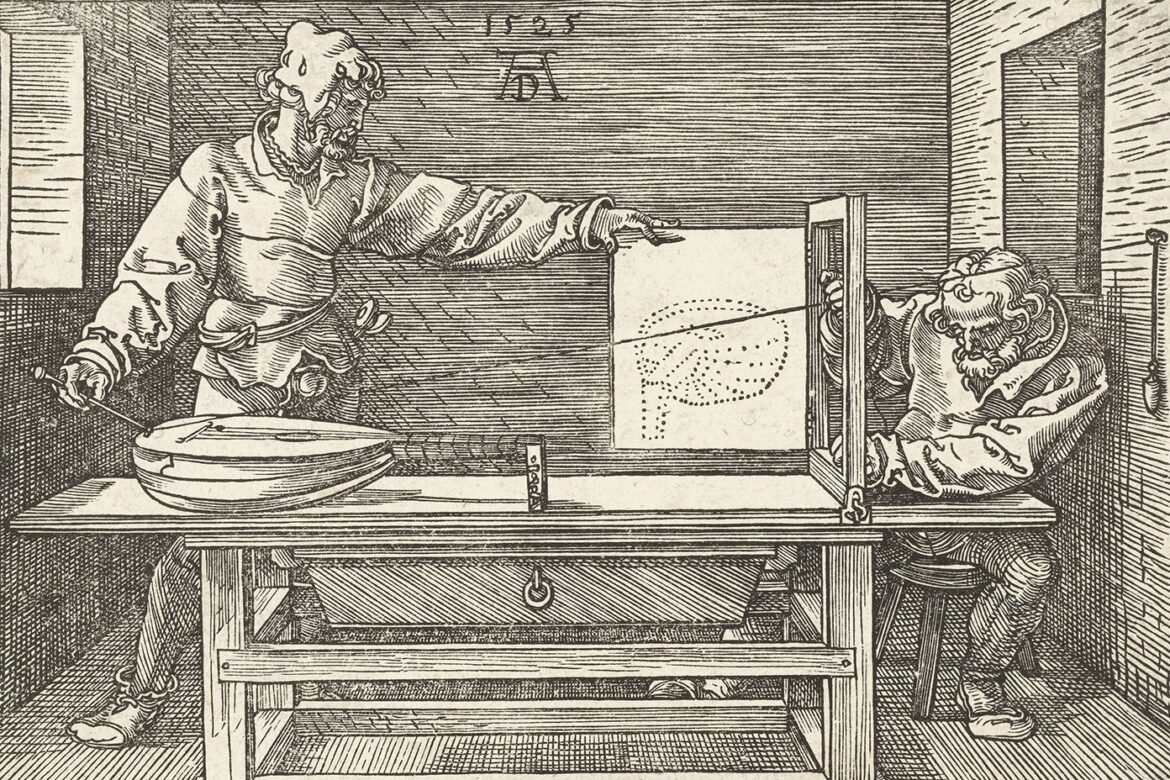
A more elaborate demonstration of this concept appears in Albrecht Dürer’s 1525 text, A Painter’s Manual. It depicts two men attempting to create a geometrically accurate drawing of a lute. They place the lute on a table in front of a window of sorts, but with a canvas instead of a window pane. They fix a string to a point in the wall where an observer’s eye would be and run it through the open window.

A 1525 engraving from Albrecht Dürer’s A Painter’s Manual demonstrating geometric perspective. Photogrammetry uses this concept to infer 3D data from 2D images.
They then move the opposite end of the string around different points on the lute, noting the position of the string in the window for each of those points, and drawing a dot on the canvas for each string position in the window frame. What emerges is a geometrically accurate dot matrix image of the lute.
Photogrammetry draws from these principles to make inferences about the dimensions and physical properties of objects. With enough overlapping pictures providing the necessary spatial information, it is possible to reconstruct a 3D model of an entire object or scene.
Triangulation
Having overlapping images is key to photogrammetry. By identifying the same points in multiple images and taking into account parameters like the camera’s position and orientation for each photograph, its focal length, lens distortion, and other variables, it is possible to determine where those points were located in 3D space. This is called triangulation.

Triangulation works by identifying common points in overlapping pictures, and determining their positions in 3D space relative to the known positions of the camera.
When one point is identified in at least two pictures taken from different known locations, we can draw imaginary lines from the two camera positions in the direction of that point. We then mathematically determine where the lines intersect. The converging lines give us the XYZ coordinates of the targeted point. And with enough points, we can construct a model of the scene.
Human beings actually do the exact same thing intuitively. We are essentially walking around with two small cameras in our heads, spaced apart slightly, to help us perceive depth and distance.
Scale and orientation
One thing to note, though, is that photogrammetric models have proportion but do not have scale. In order to scale the model, there must be at least one known distance.
This is similar to how our brain also needs a familiar object to help it estimate the size of something we are looking at. What at first looks like a full-sized building in a picture may turn out to be a miniature model when a coin is placed next to it. In photogrammetry, the equivalent of that coin would be scale bars.

Photogrammetry provides proportion but not scale. Without the T-shaped, calibrated scale bar, it is impossible to tell how big (or small) this crankshaft is.
Scale bars are calibrated, linear bars with printed markers called targets attached to them. The targets on scale bars are coded. This means software can uniquely identify each target. Non-coded targets (like the ones on the crankshaft in the picture) simply provide high-contrast reference points that help to accurately stitch the images together. They are not uniquely identifiable.
The targets on the scale bars are separated by a known distance and can therefore be used to scale the image. To ensure consistency and accuracy, scale bars are manufactured using materials whose dimensions do not significantly vary with changes in temperature.
Targets are also placed around the scene before pictures are taken to provide robust reference points that will be matched between overlapping images when the pictures are stitched together.
Photogrammetry software can automatically recognize and match coded targets between pictures, and use this information to align the images and determine the orientation of the model. The non-coded targets are additionally used to check the accuracy of the model once the software has processed it.
Consistency and quality are key
There are quite a few factors that play into what you can achieve with photogrammetry. The hardware such as cameras, lenses, and so on determine the maximum quality you can crank out. And as you would expect, the quality of the images – the resolution, how sharp they are, the depth of field, and other such factors – are also especially crucial. We will dive a little more into these later.
But other than their quality, how the images themselves are taken is just as important.
The important thing is to ensure that the object is captured fully. A useful recommendation is to make several full circles around the object, systematically taking pictures at different distances so that the camera positions create a sort of dome around it. For smaller objects, there will naturally be fewer photographs. But whatever the case, you always want to ensure the entirety of the object is in focus in all the pictures for the best results.

For best results, it is recommended that you make several full circles around the object, systematically taking pictures at different distances.
For larger objects or scenes which cannot be encircled – the facade of a building for example – the camera can be moved along a straight line parallel to the face of the building. Multiple sweeps might be needed to capture the entirety of the scene.
KEY POINT
Photogrammetry goes backwards in the photography process. By looking at multiple pictures and using principles related to geometric perspective, we can produce a 3D model from 2D data.
With aerial photogrammetry, the camera will be mounted on an aerial vehicle such as a drone, pointing downwards. If you also want to capture the sides of vertical objects like buildings or trees, it might be a good idea to angle the camera somewhat in order to adequately capture these surfaces. Here again, consistency is key.
Types of photogrammetric algorithms
In many ways, photogrammetry works like human eyesight. Each of our eyes are constantly recording overlapping pictures which we use to perceive depth and distance. Likewise, for photogrammetry to work well, we need a set of well-taken photos with sufficient information about the scene to extrapolate the required data.
Unlike human beings, however, photogrammetry does not have the luxury of being able to take an unlimited number of pictures. The quantity of images required to glean the information we need will vary depending on the size and complexity of the object or scene, and perhaps more importantly, the needs of the project.
So, while the underlying concepts behind photogrammetry remain the same, its algorithms have two broad classifications based on project needs.
Photogrammetry for engineering
If you are an engineer creating a model of an object for quality control purposes, reverse engineering, or whatever the case may be, you do not necessarily need each and every pixel in the image. To draw a straight line, for instance, you only need to know the positions of two points.
This is the concept behind what is sometimes referred to as Metric Photogrammetry. The focus with this branch of photogrammetry is precision. The point is to obtain precise measurements and calculations from photographs by determining, as accurately as possible, the relative locations of certain relevant points in pictures.

In metric photogrammetry, the algorithm extracts a model based on a number of relevant points. The aim is precision, not capturing every single surface.
Engineers therefore place targets the algorithm will recognize in areas of interest. The algorithm uses the targets to construct a model. The result is a skeleton of sorts of the relevant points, and not a dense point cloud of all the surfaces.

Targets are stuck to the object to ease the process of identifying and aligning overlapping areas between pictures.
These targeted points define the size, shape, and position of an object’s features with the emphasis squarely on accuracy. The points can reliably be used to work out distances, areas, and even things like elevation to help create a topographical map, or volumes and cross-sections for other technical uses.
Photogrammetry for color 3D modeling
In contrast, things like game development, CGI in movies, or heritage preservation demand true-to-life renders of real-world objects. As a rule, the more pixels and detail you can pack into the model, the better. Experts working in these industries will usually have the best of the best photography equipment and will therefore already be properly equipped for photogrammetry as well.

Spot the differences: 3D model from photogrammetry (left) next to model produced by Artec Leo – a scanner that can also capture texture.
The trade-off is that the final shape of the model is usually imperfect. The average 3D scanner may sometimes struggle with shiny, transparent, or black surfaces, but with photogrammetry the number of artifacts and amount of noise you inevitably have to deal with is vastly greater. The result is, ultimately, a model with high-definition texture, but also a lot of noise and imperfect geometry.

Geometry from a 3D scanner combined with texture from a camera to create a realistic and accurate model.
With these types of projects, it is better to combine photogrammetry with a 3D scanner for optimal results. We explore this further in the section on combining 3D scanners with photogrammetry.
KEY POINT
There are two branches of photogrammetry: measurement technologies typically used in engineering, and full-color visualization aimed at creating exceptionally lifelike, CGI-ready 3D models of real-world objects.
Photogrammetry hardware
Apart from targets and scale bars, which we have already covered, photographic equipment plays an important role in the process.
The results of photogrammetry depend entirely on the images used in the process. Factors like resolution, lighting, and depth of field all play a crucial role in the accuracy and reliability of the measurements from the resultant model. Detailed, clear pictures are vital.
Although it is easy to get drawn into the rabbit hole of photographic equipment, there are a few useful concepts that merit discussion. Photographers, or anyone who knows their way around a camera, are already a step ahead. If terms like focal length and aperture are part of your work or hobbies, you’re already there. You can skip the following sections and proceed to photogrammetry applications.
Sensors
Cameras come in all shapes and sizes, from mobile phone cameras, CCTV, GoPros, to full-fledged professional video equipment. To what extent they are suitable for your project might boil down to sensor sizes.
A sensor is to a camera what the retina is to the human eye. It records the picture that comes through the lens and will determine how much detail you are actually able to capture. The bigger the sensor, the more points you capture, which translates in a higher level of detail.

The sensor inside a camera records the picture that comes through the lens, and determines how many pixels your images will have.
So while a small point-and-shoot camera might do a passable job in the right lighting conditions, a high-end DSLR with a full-frame sensor (sometimes as much as 30 times the size of the point-and-shoot) would provide way more pixels and thus much better resolution for the 3D model.
The sensor size also affects what is known as the crop factor. A similar lens on two different sensors will capture different portions of the scene because a smaller sensor can “see” less, whereas a larger sensor covers more of the scene in each photograph.
Lenses
The lens is the next crucial piece of the puzzle. This is what bends the light and focuses it onto the sensor of the camera. It determines what’s in focus, exposure, magnification, and how wide or narrow the angle of view is in the image.

The lens is what bends light and focuses it onto the camera’s sensor. It has a direct effect on the quality of your images.
The lens has a curved piece of glass at one end, and its aperture (the resizable hole through which the light flows into the camera) at the other. The image is captured when the camera’s shutter opens and closes, briefly allowing light onto the sensor through the lens’ aperture. These pieces all combine to determine the characteristics of the image and are therefore important considerations in photogrammetry.
Focal length
Focal length refers to the optical distance in millimeters between the camera’s sensor and the point in the lens where light rays converge. The focal length determines the angle of view and the magnification. A smaller number (a shorter focal length) means a wider field of view and lower magnification, so the camera can capture more of the scene. In photogrammetry, you will usually have a fixed focal length.

The lens’ focal length determines magnification and the field of view – how much of the scene can be captured.
Aperture
This is a number, expressed in f-stops, that describes how wide the lens’ diaphragm opens to let light into the camera. Each f-stop doubles the amount of light that goes into the camera. Perhaps confusingly, a large number, like f-32, means a small opening, and a small number means a wide open aperture.
Aperture directly determines depth of field – how much of the scene is in focus. A wide aperture will keep a thin layer of the picture in focus and blur out the rest. This might look good in portrait photography for example, where you have pin-sharp focus on the subject, and rich blurry bokeh in the background. This type of blur is known as focus blur.

Aperture determines depth of field – how much of the scene is in focus.
For photogrammetry, you want to keep as much of the scene in focus as possible. Blurred images make stitching the pictures together more difficult.
This segues nicely to the other type of blur – motion blur.
Shutter speed and motion blur
Shutter speed is how long the camera’s shutter stays open and allows light to fall onto the sensor. It is usually expressed in fractions of a second. Apart from affecting how much light falls onto the sensor, shutter speed also relates directly to motion blur.
If the subject, or the camera, moves while the shutter is open, the resultant picture will be blurred. A good illustration of this effect is how a picture of a hovering helicopter at a sufficiently high shutter speed will freeze the rotor blades in motion, while a slower shutter speed will blur the movement so the blades won’t be visible.
If you are shooting pictures handheld, you will want to use a high enough shutter speed to counter the slight movements of your hands as you hold the camera. Alternatively, you could use a tripod to ensure the camera stays completely still.

Shutter speed determines motion blur. A faster shutter speed freezes action while a slower one blurs it.
In the end, all these factors must be carefully considered to ensure you are getting the best possible results with photogrammetry.
KEY POINT
Since photogrammetry relies on the quality of the images used in the process, it is crucial to get the photography concepts right. Image resolution, different lens properties, and camera settings like focal length, shutter speed, and others all play a vital role.
Photogrammetry applications
Photogrammetry as a technique is popular not just because of its versatility and cost, but also its effectiveness over long distances. Let’s take a look at some of its most common uses.
Large engineering projects

Aerial photogrammetry is commonly used by engineers on large construction projects.
Given its accuracy when scanning over large distances, photogrammetry is used by engineers using drones or planes to plan and evaluate large construction projects. For example, the location and design of freeways. Data from metric photogrammetry could be used to calculate earthwork quantities, and to provide essential notes on the terrain for civil engineers. It is also essential when assessing the progress of projects by providing stage-by-stage 3D renderings over time.
Film and Entertainment
With the help of photogrammetry, the gaming and film industries have been able to enhance their ability to create realistic-looking environments. By combining photogrammetry and 3D scanners, filmmakers can create set designs from accurate 3D-scan models overlaid with color information from photogrammetry. Game designers are likewise able to create believable, high-quality assets and realistic environments.
Forensics

Photogrammetry plays a crucial role in crime scene investigation and forensics.
Metric photogrammetry has also come to play an important role in forensics and crime scene investigation. In many cases, it’s the small details that make all the difference. Being able to accurately capture a crime or accident scene with precise measurements can be critical not just in court cases but perhaps even more importantly, in making the built environment safer.
An example is how, by analyzing tire marks in a picture of a road surface, investigators were able to determine whether the skid marks matched the dimensions of a car a woman had been driving, and its position on the road relative to a second vehicle that hit her car and badly injured her. Metric photogrammetry proved crucial in resolving conflicting accounts of the positions of the two vehicles when the accident occurred.
Land Surveying

Aerial photogrammetry is often used by local municipalities and civil engineers for land surveying.
Metric Photogrammetry is also used by construction crews, architects, and municipalities to determine the boundaries of property, to plan construction projects, or for data analysis. Satellite imagery also provides this information, but aerial photogrammetry often offers better accuracy for specific areas of interest.
Photogrammetry in Real Estate
Photogrammetry is also used to create virtual models of homes that can be viewed by prospective owners. Many buyers were already relying on online listings to make purchase decisions. And now, a covid-induced shift in culture has probably accelerated the move online for many real estate businesses. At a fraction of the cost, modern photogrammetry enables real estate agencies to create a virtual experience of the homes they advertise.
Mapping
Using photos taken using drones, planes or satellites, photogrammetry has been used to 3D map terrains. With high-resolution images taken from aircraft or submersible vehicles, it is possible to create models of difficult to reach areas – including underwater – with a much faster turnaround time.

Photos taken from drones, planes or satellites have been used to 3D map terrains
Google Earth is to date the most ambitious project that has used photogrammetry to create accurate images of the earth’s terrain. Google uses billions of images from multiple sources – Street View, aerial, and satellite imagery – all stitched together to show details about an area including precise distances between objects like roads, lane markings, buildings and rivers.
Archaeology
In archaeology, the ability to map an area and understand the layout and structure of a site is absolutely essential. Metric Photogrammetry offers archaeologists the ability to map an area and record artifacts of interest quickly and accurately. The ability to share the 3D renderings also facilitates collaboration with other archaeologists who may not be on site.

One of the most common uses of photogrammetry is in heritage preservation.
KEY POINT
Photogrammetry is used in a wide variety of scenarios across many different industries. It’s largely applied in situations that are measurement related, or to model real life objects.
When not to use photogrammetry
There are a few pitfalls to keep in mind when deciding whether to go with photogrammetry or not. In a nutshell, the considerations to weigh are based on the project needs.
Metric photogrammetry without specialized gear
If your goal is to make accurate measurements and color information is not a priority, you should only use photogrammetry if you have a good photogrammetry kit specifically designed for measurement-related applications – like Hexagon’s high-end photogrammetry systems. These will come with a digital camera, set of targets, and a set of accurately calibrated scale bars to ensure you are fully equipped for your task.

Complete photogrammetry kit specifically designed for measurement-related applications.
However, keep in mind that despite its accuracy, even such a kit will produce a sparse point cloud compared to a good 3D scanner.
High accuracy with a dense point cloud
So, if you need a dense point cloud as well as accuracy, a scanner like Artec Eva, which is capable of capturing and simultaneously processing up to two million points per second, with an accuracy of up to 0.1 mm, is a much better bet.
In fact, with its structured-light scanning technology, Eva accurately captures objects of almost any kind, including objects with black and shiny surfaces, with no need for targets, making it an excellent all round solution.
Color and texture data without a high-end camera
If, on the other hand, your needs from photogrammetry are not measurement-related and you are using photogrammetry mainly to capture texture, you should first ensure that the camera equipment you are using for photogrammetry is capable of better quality than a scanner like Artec Space Spider, or Artec Leo – scanners that capture texture.

If you are using photogrammetry to capture texture, ensure that the camera you use is capable of better quality than a scanner that captures texture, like Artec Space Spider, or Artec Leo.
People in film or game design typically own high-end photography equipment. Such specialized gear would produce extremely high quality imagery, most likely surpassing the texture from an average 3D scanner’s camera.
That said, this type of photogrammetry does not use targets and is therefore prone to inaccuracy. So even with a high-quality camera, it is a good idea to use it in tandem with a professional 3D scanner that will produce an accurate model to combine with the texture. All Artec 3D scanners are capable of scanning without targets and so would be an excellent option to pair with this type of photogrammetry.
General drawbacks of photogrammetry
Overall, the drawbacks of photogrammetry are that it is time-consuming, requires a good amount of expertise to pull off correctly, and even then, may not produce the results you need if the conditions aren’t just right. You might need to take dozens – sometimes hundreds – of photos one by one, ensuring each picture is of sufficiently high quality and that there is adequate overlap between pictures.
Also, unless you’ve taken the trouble of preparing the scene with controlled lighting, you’ll also need to make sure that there are no dramatic changes in lighting conditions from one photo to the next. A shadow that falls across your object in one picture, for example, will also appear in the final model.

Photogrammetry requires even and adequate lighting, so you need to plan and prepare your scene accordingly.
In contrast, most handheld 3D scanners produce their own light and will illuminate the subject during the scan. So, unless your goal is to get good quality texture from your scan, you don’t have to worry half as much about light as you do with photogrammetry. With handheld 3D scanners, there is comparatively little preparation required in order to scan a scene.
KEY POINT
It is generally better to use a 3D scanner when you want a dense point cloud that is highly accurate. Photogrammetry works well when you want photo-realistic texture and you have a great camera – better than that in a 3D scanner. Use photogrammetry for measurement purposes only if you have a professional kit and are happy getting a sparse point cloud.
A scanner like Artec Leo comes with a touch screen that builds a real-time replica as you scan, offering a fully mobile scanning experience. The device has onboard automatic processing, an inbuilt battery, and wireless connectivity that enables you to stream to a second device. So with Artec Leo, scanning is not much different from shooting video.
That said, photogrammetry does have its pluses. It can be done at a lower cost compared to 3D scanning. It also works well if you are scanning a large area, typically more than a few meters.
Combining photogrammetry with 3D scanning
Long story short: If texture is of secondary importance and it is more critical to produce dense point clouds with minimal noise and very high accuracy, 3D scanning is the way to go. The best 3D scanners provide extremely rapid scanning ability, automatic processing, and a 3D point accuracy of up to just fractions of a millimeter.
However, if your project requires true-to-life texture and lifelike models, and your own top-of-the-range photography equipment, you might want to turn to photogrammetry. The caveat being that with photogrammetry for texture, you have to make do with imperfect geometry. That’s because if you want texture, you need more pictures, and these are taken without targets. With that comes a lot of noise and artifacts, and you invariably lose accuracy.

If you need true-to-life texture and lifelike models, and you have professional equipment, photogrammetry is a good solution – although it won’t produce the geometric accuracy a 3D scanner will.
You can still draw from the best of both worlds by combining photogrammetry with 3D scan data, a technique demonstrated in the video below where photogrammetry was used with Artec Eva to produce this breathtaking model of a car.

Geometric data from a 3D scanner can be combined with texture from a high-end camera to create a highly accurate render.
Or take this stunning render of a running shoe captured using a handheld Artec Space Spider for example. The final model was stitched together from over 300 pictures and combined with the scanned data. The color is brilliant, and the level of detail simply outstanding.
Combining the two is the optimal solution, and one favored by even the most finicky industry professionals. For example, images from an array of cameras placed around President Barack Obama were combined with the scanned data from Artec Eva to create the first ever 3D portrait of a US president.
The cameras provided detailed and rich texture, while the 3D scanner’s accuracy produced a structure with minimal noise to wrap the texture around.
KEY POINT
Using a high-end camera for texture and a professional 3D scanner for geometric data and then combining the two using software like Artec Studio will give you the best results: stunning texture, and low-noise, extremely precise geometric data.
Photogrammetry Software
There is a wide variety of photogrammetry software on the market. With a little research, you can find anything from free applications, to software packages that cost thousands of dollars. Again, it all comes down to what your needs are and what resources are available to you.
If you are just starting out with photogrammetry, it might be a good idea to start with free solutions like 3DF Zephyr, Meshroom, or Visual SFM. However, these offer limited functionality and may be slower or produce less accurate results. You may also need to install additional plug-ins to be able to do things like create textured meshes with color.
If you need more features, you could opt for more comprehensive options like Elcovision, iWitness or Photomodeler. MetaShape, Pix4D, and Reality Capture are also popular options.
For those using photogrammetry for metrology, a package like Hexagon’s Aicon 3D Studio provides intelligent and powerful tools. The software also offers the possibility to interface with PolyWorks through a plugin. PolyWorks supports an extensive array of 3D measurement functionality and should be sufficient for most tasks performed by industrial manufacturing companies.
For CGI professionals or anyone that wants the absolute best in terms of both geometry and texture quality, Artec Studio 16 offers an easy workflow that enables you to achieve perfect geometry as well as excellent texture quality. The software has undergone a refresh that makes mapping texture onto mesh data from a 3D scanner seamless.
Artec’s award-winning 3D scanners are capable of extremely accurate scans, achieving industry-leading benchmarks like accuracy of up to 0.05 mm for Artec Space Spider, one of the handheld models, and an even higher precision of up to 10 microns with Artec Micro – a desktop scanner.
With Artec Studio 16’s powerful features, you can automatically align pixel-perfect photographs from a high-res camera, to 3D scans from precise metrology-grade scanners, and achieve incredibly realistic 3D models.
